The reasoning you're not allowed to see你看不到的那部分推理 A model's real thinking is long, messy, and hidden. We bring it back. 模型真正的推理冗长、杂乱,且被隐藏。我们将其还原。 The biggest recent leap in model capability comes from letting models reason longer before answering. But the API normally exposes only a compact summary. Our work turns the signature field into a checkable unlock path, so you can inspect far more than the final answer. 模型能力近来最大的一次跃升,正来自让模型在作答前进行更长的推理——如今大部分"智能"都藏在这段看不见的思考里。 但 API 通常只暴露一段高度压缩的摘要。我们的工作把 signature 字段转化为一条可验证的解锁路径, 让你看到的远不止最终答案。 01Model reasons模型推理 A long private chain of thought — the real intelligence.一段私有的长推理,智能真正所在之处。 02Provider hides it厂商将其隐藏 You get a lossy summary from another model — or nothing.你拿到的是另一个模型生成的有损摘要,或什么都没有。 03Signature seals it签名将其封存 The signature preserves a sealed reasoning state.signature 保存着一份封存的推理状态。 04We unlock a view我们解锁视图 A deeper trace you can check yourself.一份更深层的推理轨迹,可自行验证。 You shouldn't believe any of this on our say-so — so don't. Bring a secret we have never seen, hide it in a model's private reasoning, and hand us only the signature. If the secret comes back — a secret we never saw — you have checked the unlock path yourself. 你不必因为我们这么说就相信,那就别信。取一个我们从未见过的秘密,将它藏进模型的私有推理中, 只把签名交给我们。如果这个秘密最终被读了回来,你就亲手验证了整条解锁路径。 ~1 curl command · your secret never reaches us一条 curl 命令 · 你的秘密绝不会传到我们这里 Why the hidden reasoning matters为什么这段隐藏推理如此重要 The answer is the tip. The reasoning is the iceberg.答案只是冰山一角,推理才是水面下的整座冰山。 For a modern reasoning model, the visible answer is a tiny compression of a much larger hidden process. The chain of thought is where the model actually does the work — and it is the single most valuable, most revealing artifact a model produces. When it stays sealed, you lose far more than a few extra paragraphs. 对当代推理模型而言,你看到的答案只是一段更庞大的隐藏过程被高度压缩后的结果。思维链才是模型真正推理之处, 也是它所能产出的、最有价值、最具信息量的部分。一旦被封存,你失去的远不止几段文字。 🧠It's where the intelligence lives智能就藏在这里 The largest recent capability gains — hard math, multi-step planning, code, careful analysis — come almost entirely from letting the model think longer before it answers. Read only the answer and you're judging a model by its last sentence, blind to the reasoning that produced it. 近来最大的能力提升,无论是数学难题、多步规划、代码还是缜密分析,几乎都来自让模型在作答之前推理得更久。 只看答案,等于仅凭最后一句话去评判一个模型,却对产生它的推理过程一无所知。 🔍It's the only way to trust the answer这是信任答案的唯一途径 A correct-looking answer can hide a wrong reason, a lucky guess, or a quiet leap. The chain of thought shows how the model got there — the assumptions, the checks, the moments it nearly went wrong. Without it, "trust me" is all you have. 一个看似正确的答案,背后可能是错误的理由、侥幸的猜测,或是被略过的一步。思维链展示模型如何得出结论: 它作了哪些假设、做了哪些验证、又在哪里险些出错。没有它,你手里只剩一句"相信我"。 ↩️The dead ends are the real story走过的弯路才是关键 Real reasoning is messy: false starts, backtracking, self-correction. That trial-and-error is exactly what a polished summary throws away — yet it's what reveals how the model truly reasons, where it struggles, and how robust the final answer really is. 真实的推理是杂乱的:走错方向、回溯、自我纠正。这些试错恰恰是光鲜摘要会丢弃的部分, 却也正是它,揭示了模型究竟如何推理、在哪里受阻,以及最终答案到底有多可靠。 Why unlocking it matters为什么"解锁它"很重要 The summary is small. The hidden process is where the action is.摘要很短,真正的过程在背后。 The reasoning is the most valuable thing the model produces — and it's the one thing you're not allowed to see. The API returns, at best, a short summary written by a different, smaller model; often it returns nothing at all. Unlocking a deeper view from the signature closes that gap. 推理是模型产出中最有价值的部分,却偏偏是唯一不让你看的。API 最多返回一段由另一个更小的模型撰写的简短摘要, 很多时候则什么都不返回。从 signature 中解锁更深一层的视图,正是为了填补这一缺口。 📄A summary is not the reasoning摘要不等于推理 The exposed summary is lossy by design: it's a second model's paraphrase, cleaned up and compressed. The dead ends are gone, the detail is gone, and much of the useful process disappears. We unlock a richer trace, not just another answer. 暴露出来的摘要天生有损:它是另一个模型的转述,经过润色与压缩。弯路没了,细节没了,大量有用的过程也随之消失。 我们解锁的是更完整的推理轨迹,而不只是再给一个答案。 ✅Checked, not hand-waved经得起验证,而非空口宣称 The view is scored for length, stability, and truncation. When the checks line up, the trace is a much stronger artifact than a polished recap. 这份视图会经过长度、稳定性与截断检查。当各项检查一致时,它远比一段光鲜的复述更具说服力。 🔐Verified by a secret用秘密来验证 You don't have to trust us. Hide a secret we've never seen inside a model's reasoning and hand us only the signature. If we read it back, that's something concrete you can check. 你无需相信我们。把一个我们从未见过的秘密藏进模型的推理中,只把签名交给我们。 若我们能将它读回,这便是你可以亲手核验的结果。 Prove it with a secret only you know用只有你知道的秘密来验证 Don't take our word for it. Pick a secret, generate a signature yourself against your own provider, and hand us only the signature — never the secret. We run the unlock and show you exactly what comes back. 不必轻信我们。自己想一个秘密,用你自己的 provider 亲手生成签名,只把签名交给我们, 绝不交出秘密。我们运行解锁,并将读出的结果如实展示给你。 1 Pick your provider and secret选择 provider 和秘密 Choose where you have credentials, type any secret string, and paste your API key/token. Everything here stays in your browser — we build a curl command for you to run in your own terminal. 选一个你持有凭据的平台,输入任意秘密字符串,粘贴你的 API key/token。这里的一切都只留在你的浏览器中, 我们只为你拼出一条 curl 命令,供你在自己的终端里运行。 Provider提供商 Anthropic API (official) OpenRouter (Anthropic native) AWS Bedrock (official) Your secret你的秘密 randomly generated in your browser — we've never seen it在你的浏览器中随机生成,我们从未见过 API key / token Model模型 2 Run this in your terminal — it prints only the signature在你的终端中运行,它只会打印出签名 Your secret is embedded in the request but kept out of the visible answer; the command extracts just the signature. (Requires curl; the jq-free version uses grep.) 你的秘密嵌在请求中,但不会出现在可见答案里;命令只提取 signature。(需要 curl; 此版本不依赖 jq,改用 grep。) 3 Paste ONLY the signature back here把签名(仅签名)粘回这里 We run the unlock. Your secret is not sent to this server in plaintext; what comes back is something you can verify yourself. 我们运行解锁。你的秘密不会以明文发送到本服务器;读出的结果,你可以亲自核验。 secret unsealed from your signature从你的签名中解封出的秘密 — ✓ exact match to your secret与你的秘密逐字符一致 Running on当前模型 Claude Opus 4.8 Have a normal multi-turn conversation. Each reply shows three layers: the visible answer, the short summary the API exposes, and — on demand — an unsealed reasoning view behind that turn. 进行一段普通的多轮对话。每条回复展示三层:可见的答案、API 给出的简短摘要, 以及那一轮背后的解封推理视图(按需展开)。 divisor sums约数和 · ~2k tok letter arithmetic字母算式 · ~3k tok graph labeling图标号 · ~14k tok logic grid逻辑网格 · ~16k tok Summaries are what the API normally returns · deeper reasoning views are unlocked on demand.摘要是 API 通常返回的内容 · 更深层推理视图可按需解锁。
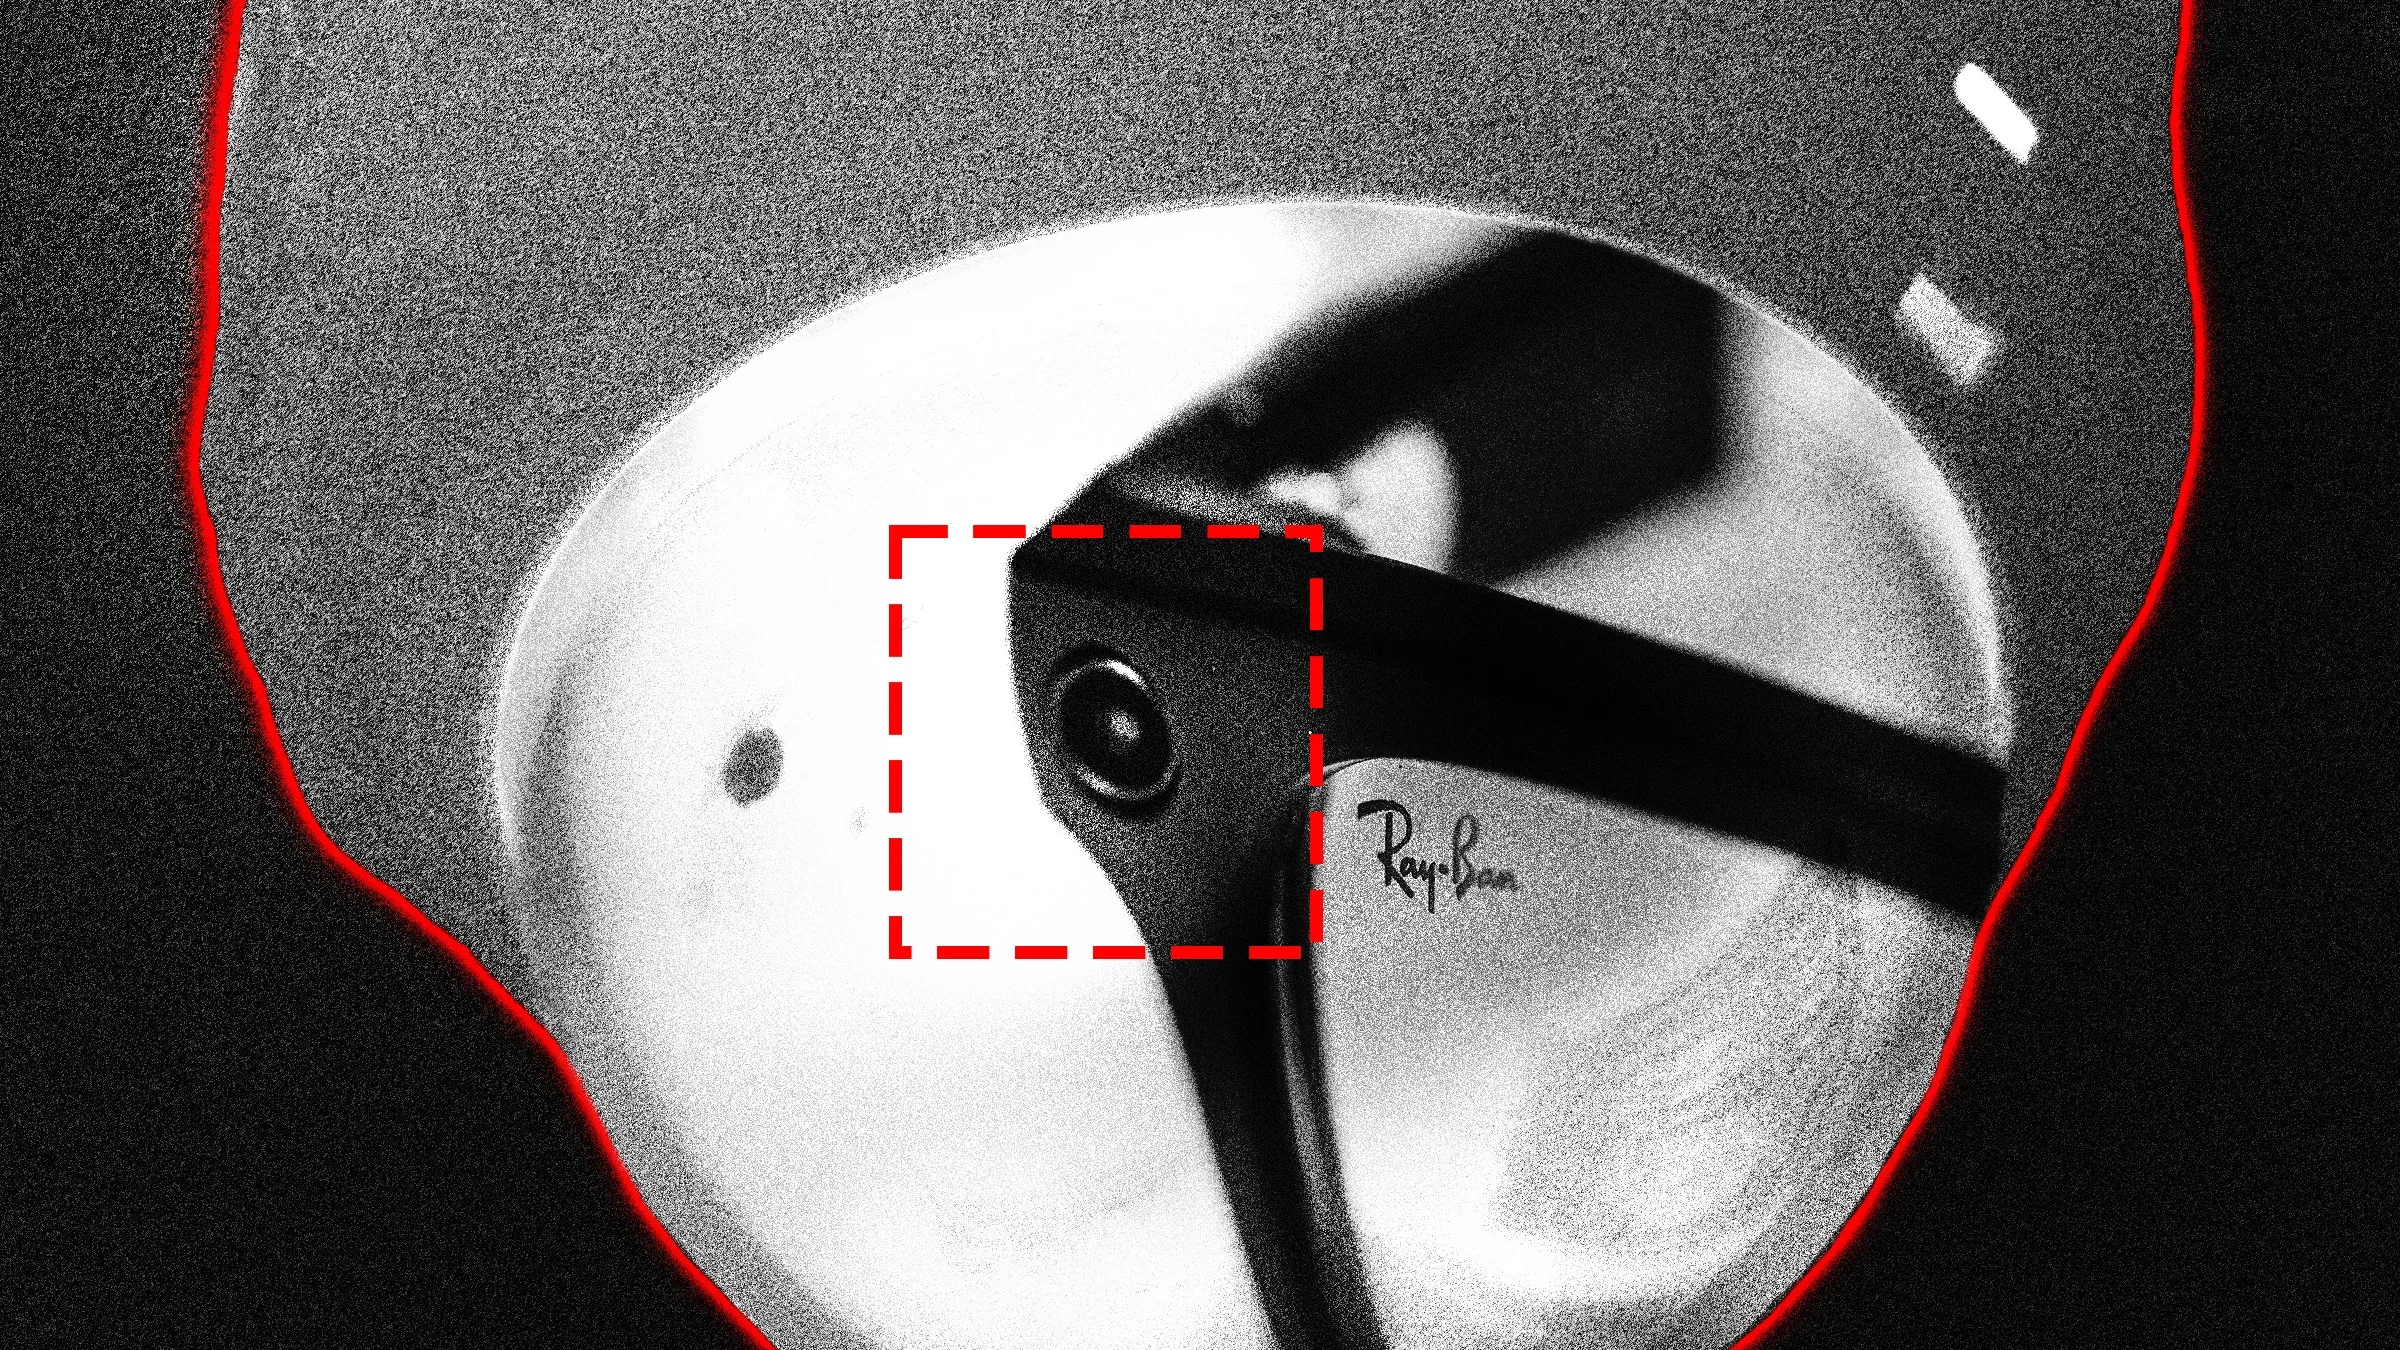
Rank One, whose board includes a former CIA deputy director and a former FBI science chief, supplied face recognition to Meta for internal development of its smart glasses app.

Visual HTML page editor that renders real HTML and CSS with browser-accurate fidelity inside an isolated iframe canvas - neikiri/neiki-page-editor
AI Engineering for Curious Professional Developers
Tiiny Host is the simplest way to share your work online.



US military drone losses in Iran war spur Pentagon call for cheap replacements.



Self-Hosting My Own LLMs Originally published 2026-07-05. At the beginning of 2026 I decided I wanted to self-host all the software that would give me a "ChatGPT"-like experience, but fully under my own control and ownership. I had a few reasons. Some were the usual ones — privacy and total ownership of my own data. Some were pure curiosity: LLMs seemed like something approaching black magic, and I wanted to look behind the curtain. And some were about self-sufficiency — what happens if OpenAI or Anthropic decide to start being less generous with their technology? This post explains the tools I eventually settled on, and how I configured them in a way that suited my needs. The Big Why At a time when ChatGPT, Claude, Gemini and plenty of others are being handed to users for free, why go to the time and expense of recreating something that’s admittedly inferior? I’ll go through a few reasons, but the main one comes down to data sovereignty. I wanted full ownership and control over my own data. Full stop. I know I’m an outlier here. But it’s the same reason I still pay — in 2026, even! — for an email service instead of relying on Gmail. Throughout 2025 I found myself having more and more conversations across ChatGPT, Claude and other services, and I realized those conversations were deeply personal and valuable to me, even when I wasn’t chatting about anything especially private. I wanted to be able to look back and easily find a conversation I’d had months (or eventually years) earlier. I know ChatGPT, Claude and Gemini all offer that kind of history — but I’d grown uncomfortable with the idea that I was building up a library of my own conversations inside someone else’s walled garden. Technically, they own that data, and therefore my conversations. I felt very little agency over something that felt like it should be entirely mine. So it was settled: I would use open-source tools to host my own chat interface — and if at all possible, power it with large language models running on my own machine. There were other reasons, too. I like tinkering, and I wanted to see how the LLM sausage gets made. Chatting with ChatGPT online felt mysterious and hard for me to fathom — how did this new technology actually work? There’s no better way to learn than to set it up locally and watch all the moving parts. Lastly, there’s the self-sufficiency angle. We’ve already seen powerful closed-source models kept behind tightening restrictions and steep prices — Anthropic’s Mythos and Fable, OpenAI’s GPT-5.6. And even when the models aren’t formally restricted, plenty of people swear up and down that the big providers quietly throttle them at busy times. Whether that’s actually true is more or less unknowable — but there’s an antidote either way: use open-weights models that aren’t so directly under any one company’s control. A local model, running on my own hardware, is something that neither the government nor big business can so easily restrict or take away. The Cost Before I begin, I should give some context about the sort of hardware I have. It’s 2026, and hardware — memory especially — is suddenly expensive, because we’re in the thick of a generative-AI bubble. People are paying scalper’s prices for the hardware that lets you run models locally. Pretending this is all doable without dropping a modest amount of money would be disingenuous. So what am I running, and what did it cost? I’m running what most people would call an enthusiast’s setup: some decent hardware, but nowhere close to a high-end build. I started this with a custom AMD desktop I built right before COVID, paired with a video card I picked up last year. In 2026 it’s not remotely cutting edge, and that’s fine. I built it around AMD’s Ryzen 9 5900X — a 12-core beast at the time — and loaded it up with about 80 GB of DDR4. I really wish I’d bought more memory back when it was cheap a couple of years ago, but so does everyone else. Even so, this is a very solid (if not cutting-edge) machine. Last summer I walked into Micro Center and walked out with a refurbished NVIDIA RTX 3090 Ti for $850 plus tax. I remember wondering at the time whether it was a dumb purchase. I’m now sleeping very easy with that acquisition — it turned out to be a great buy. The 3090 Ti and its 24 GB of VRAM do the majority of the heavy lifting in my system, and that 24 GB is the single most important number in this whole story: it decides which models fit, and shapes nearly every configuration choice I make later on. Luckily I’d already put a largish 850-watt power supply in the machine, so I didn’t need to upgrade that either. So how much would this setup cost to assemble today? This got me curious about my original build cost. Back in Chicago I actually lived within walking distance to a Micro Center, a deeply expensive convenience for me. I did my whole build using Micro Center, and I thought it would be fun to pull up my original receipts…mostly just to cry at the prices. Component Date Price (pre-tax) Samsung 950 Pro 256GB M.2 drive Feb 2017 $148 G.Skill 2x8GB DDR4-3200 (starter memory) Aug 2020 $58 Seasonic GX-850 850W Gold power supply Aug 2020 $160 ASUS X570-Pro Prime (AM4 motherboard) Sep 2020 $180 Samsung 970 Evo 1TB M.2 drive Nov 2020 $104 Crucial Ballistix 2x32GB DDR4-3200 Dec 2020 $265 Thermaltake Core P3 case Mar 2021 $160 Ryzen 9 5900X May 2021 $550 Noctua NH-D15 CPU cooler Jul 2021 $92 Nvidia 3090 Ti (refurbished) Sep 2025 $850 Total $2,567 I originally built the computer with a Ryzen 5 3900X in it, but I upgraded later, so I’m only listing components in the final build. Most of the machine came together in mid 2020. In Sept 2020 I bought an AMD RX 5500 XT that had 8GB of ram for $200 (also refurbished at Micro Center). At the time, crypto mining was placing an enormous demand on cards, especially Nvidia ones. I wasn’t yet ready to pay blockbuster prices for a super in-demand card, which is how I settled on the RX 5500 XT. Now that I reflect back on the prices I paid, I’m actually a little surprised to see that I dropped $265 on two 32GB sticks of RAM. That’s more than I could buy it for today I think, which puts the current memory bubble into perspective a little. Even though we’re in the midst of global memory shortage and memory of all kinds (current, last generation) have spiked since a year or two ago, my anecdotal prices are still cheaper than they were in 2020. Interesting. Basic Architecture We’ll get into the details on each component below, but first let’s zoom out so we don’t miss the forest for the trees. Here’s the whole stack on one page: Desktop (home) ─┐ ├──▶ Open WebUI Phone (away) ───┘ │ (via Tailscale) ▼ llama-swap │ ▼ llama.cpp │ ▼ model Everything from Open WebUI rightward is self-hosted on hardware I own; only the phone’s traffic takes the Tailscale detour to get in. (As we’ll see, Open WebUI and the inference server don’t even have to live on the same machine.) My AMD desktop runs Linux. Which distribution probably doesn’t matter much — I’m on a Debian variant at the moment, though I might redo the whole setup on Fedora one of these days (like I said, I like to tinker). This guide assumes a Linux environment. A quick note on the GPU: I actually got things running first on a small 8 GB AMD Radeon card I already had, before the NVIDIA. It’s certainly possible to use a GPU from someone other than NVIDIA, but I struggled a bit getting the AMD card working — non-NVIDIA cards are still something of a second-class citizen in the local-LLM world. What tripped me up more, though, was that card’s meager 8 GB of VRAM, which is ultimately what pushed me to jump to the 3090 Ti. So what does the stack actually need? Besides the open-weights models themselves, you need something to perform inference — the act of taking incoming text (my chat prompts) and running it through the model to produce a text response. There are several options here, and I landed on llama.cpp. It’s not as hardcore as vLLM, but it’s a little more "enterprise" than something like Ollama or LM Studio. By design, though, llama.cpp doesn’t hand you a nice web interface for actually chatting with the model. For that you need a chat front-end. There are many (LibreChat, Oobabooga and SillyTavern all came up while I was looking), but I settled on Open WebUI. A big reason was that I could reach my Open WebUI server from my phone — an important detail for me. I wanted the whole setup to be usable from both my desktop and my phone while I’m on the go, and at the time Open WebUI had the most viable options for use on my iPhone. (Incidentally, I ended up using an iOS app called "Conduit" to reach my Open WebUI server from the phone — though the app ecosystem is always shifting.) With Open WebUI out front and llama.cpp doing the inference, I was nearly in business. My remaining problem was picking which open-weights model to run — there were actually several intriguing candidates, and I wanted to switch between them easily. Trouble is, changing models would normally mean restarting llama.cpp, and that’s not something I can do from my phone. That’s where llama-swap comes in. It acts like a little local router that sits between Open WebUI and my llama.cpp inference server, and it lets me expose a handful of different models at once. I pick a model from inside the Open WebUI chat window and just start talking; llama-swap works with llama.cpp to spin up inference on the right model automatically. No stopping and starting services from the command line. It just works. Lastly, there’s the small matter of reaching all this while I’m out and about. To keep things simple, I took the plunge with Tailscale, which lets you build a personal mesh VPN. I run Tailscale on both my home server and my phone, so when I’m away from home I just make sure I’m connected to my Tailscale network (my "tailnet") and the Conduit app on my phone can reach my Open WebUI server as if I were sitting at home. To Docker or Not to Docker I started out by following a few online guides for installing llama.cpp on Linux, and I initially decided to run everything from pre-built Docker containers — it seemed like the cleaner solution, easier to isolate and configure. At first I had separate containers for Open WebUI and llama-swap (whose image also bundled the llama.cpp llama-server binary), and I later added a third for Redis. Over time, though, I drifted away from containers. The main reason was that I needed to stop using the pre-built images and start running my own custom binaries. For a while I baked those custom binaries into a custom Docker image, but eventually that started to feel like too much work. The Open WebUI container was the first to go — though it didn’t disappear so much as move. I have a second machine in the house, some sort of Dell OptiPlex, that I use as a souped-up NAS running FreeBSD. It’s a rock-solid server, unlike my AMD desktop, which was constantly crashing while I figured out how to safely load these enormous models onto the 3090 Ti. The 3090 Ti had to stay in the desktop — which dictated where llama.cpp would run — but Open WebUI could technically live anywhere. So I moved it into a jail on the FreeBSD box for the sake of stability. That move quietly solved a problem I’d been papering over. Back during all the crashing and rebooting, every restart of the Open WebUI service logged my clients out and forced them to re-authenticate immediately — which got old fast. Redis was my fix: it let logins persist across service restarts. But once Open WebUI lived on the rock-solid FreeBSD box, it hardly ever restarted. My inference machine still hiccups and goes down now and then, but that no longer takes Open WebUI down with it. So I just… forgot about Redis. I never installed it on the FreeBSD box, and it drifted out of the picture entirely. That left just one container with llama.cpp and llama-swap in it. For llama.cpp, I kept finding myself wanting the absolute latest version. When Google released the Gemma 4 models, I downloaded one right away and tried to use it — and got errors, because my version of llama.cpp didn’t fully recognize the new model. The fix was to run a newer llama.cpp, but as long as I was using someone’s pre-built Docker image I was at the update mercy of whoever built it. I wanted to be able to pull the latest llama.cpp source, build it myself, and run that. You can do that with Docker, of course — but at some point I decided it was simpler to stop using Docker and just run the binaries directly on Linux. I also wanted to run a slightly modified build of llama-swap (more on that later), and once I was building my own llama-swap binary anyway, wrapping it in a container felt like a pointless extra step. So today none of this stack runs in Docker. It’s a little simpler for me to manage. Was Docker bad, or slow? Not at all — this really just comes down to preference. Inference engine: llama.cpp There are several options for serving up the raw language-model files. If you want a GUI and a gentler experience, LM Studio has been around for years and is a great option. But I wanted something that ran from the command line as a service or daemon. Ollama fits that bill, but I kept seeing it described as "llama.cpp with training wheels" — and in that case, I figured, why not just use llama.cpp itself? I also briefly checked out vLLM, but my particular use case — where I’m the sole user of my local stack — didn’t really play to its strengths (vLLM shines when you’re serving lots of concurrent users). llama.cpp turned out to be the sweet spot: a robust headless inference server, with "prosumer" touches like being able to offload layers of a too-big model onto the CPU — at the cost of speed — when VRAM gets tight. Like I said earlier, I started out running whatever version of llama.cpp happened to ship inside my pre-built llama-swap container. But I wanted to track the very latest release: pull it from GitHub, build it, and run that. That’s ultimately what drove me off Docker and onto binaries installed directly on my Linux system. The build itself is refreshingly simple. After cloning the repo once, keeping it current and reinstalling looks something like this: cd llama.cpp git pull mkdir -p build && cd build cmake .. -DGGML_CUDA=ON make -j4 # had to lower this on my machine to avoid a segfault that was likely caused by nvcc running out of RAM sudo make install The -DGGML_CUDA=ON flag is what builds in NVIDIA CUDA support. The final sudo make install drops the freshly built llama-server into /usr/local/bin, where the rest of my setup expects to find it. Going native did give me some heartburn the one time I also tried to run llama.cpp on my AMD card. An AMD card needs llama.cpp built against AMD’s ROCm stack rather than NVIDIA’s CUDA, so I suddenly had two different builds to juggle — one CUDA-compatible, one ROCm-compatible. I managed it by renaming binaries, which worked but felt gross; this is exactly the kind of situation where a Docker container would have been the cleaner approach. In the end, though, I just let the AMD card quietly fade out of my setup. It was only an 8 GB card, after all. llama-swap If I’d wanted to just pick one model and stick with it, my life would have been a little simpler. Instead, I wanted to start a chat with one model and then, in the very next session, switch to a different local model. That requires restarting llama.cpp (pointed at the new model each time). Rather than do that by hand, there’s a way to have software restart llama.cpp on my behalf: llama-swap. llama-swap is a proxy that sits in front of llama.cpp. Requests hit llama-swap first, and it looks at which model was requested. If llama.cpp is already running that model, llama-swap just passes the messages along and llama.cpp infers away. But if the request is for a different model, llama-swap does the dirty work: it stops llama.cpp and restarts it with the newly requested model. There’s a 10–15 second wait while llama.cpp reloads, but after that it’s back to inferring away. llama-swap looks like pretty simple software, so why did I want to run a custom version of it? My problem was that, early on, llama.cpp was often crashing on me — usually because I’d given it incorrect model settings. Unfortunately, when llama.cpp crashed, llama-swap would essentially swallow the error, and I’d never see anything useful in my chat window. So I wrote a small patch to fix exactly that. It took a little fiddling, but I eventually got it working. At first I was going to post a diff of my patch, but while preparing it for this post I noticed that the patch no longer works for the latest version of llama-swap. I’m in the process of trying to get a revised patch merged into the llama-swap project itself, so fussing over this may soon no longer be needed. Here is the basic idea behind the patch: llama-swap already captures the upstream process’s output (both stdout and stderr) into a log buffer. My change hooks the point where llama-swap gives up on a model that exited before it ever became ready: instead of returning a generic "the process exited" message, it pulls that captured output and folds it into the error it hands back. So the client sees the model’s actual complaint — a rejected flag, an out-of-memory abort, whatever it was — rather than a shrug. The one wrinkle is that the log buffer accumulates across attempts, so I also clear it at the start of each launch; a repeated failure then shows only the latest attempt’s output instead of stacking duplicate copies. For llama-swap to know which models it can offer up, it needs a configuration file. That file is essentially a collection of llama-server startup commands — one for each model you want to make available. Want to run a model with a 128k-token context instead of 64k? Configure that here. Want to run a model half on the GPU and half on the system CPU? That goes here too. Basically any setting that controls how llama.cpp gets launched lives in the llama-swap config file. So what does mine look like? This isn’t the whole thing, but it’ll give you the idea. (And no, I don’t really know whether these settings are truly optimal — I’ve just tinkered with them until each model runs okay on my machine.) # llama-swap configuration listen: "0.0.0.0:9292" healthCheckTimeout: 120 logToStdout: "both" sendLoadingState: true models: qwen3.6-35b-IQ4: cmd: > llama-server --model /ryzenstore/models/Qwen3.6-35B-A3B-UD-IQ4_XS.gguf --port ${PORT} --host 0.0.0.0 --n-gpu-layers 99 --flash-attn on --ctx-size 262144 --cache-type-k q4_0 --cache-type-v q4_0 --batch-size 512 --ubatch-size 512 --threads 8 --no-mmap qwen3.6-27b-Q5: cmd: > llama-server --model /ryzenstore/models/Qwen3.6-27B-Q5_K_M.gguf --threads-batch 8 --port ${PORT} --host 0.0.0.0 --ctx-size 262144 --spec-type draft-mtp --spec-draft-n-max 2 -ngl 99 -fa on -ctk q8_0 -ctv q8_0 -nkvo gemma-4-31b-Q4: cmd: > llama-server --model /ryzenstore/models/gemma-4-31B-it-Q4_K_M.gguf --port ${PORT} --host 0.0.0.0 --n-gpu-layers 99 --flash-attn on --reasoning off --batch-size 512 --ctx-size 128000 --cache-type-k q4_0 --cache-type-v q4_0 You’ll notice each command uses ${PORT} rather than a hard-coded port number. llama-swap fills that in when it launches the model, so it stays in control of the wiring between itself and llama.cpp. The chat front-end: Open WebUI Everything up to this point has been plumbing. Open WebUI is the part I actually look at — the ChatGPT-style chat window in my browser and on my phone. As I mentioned earlier, it’s the one piece of the stack that doesn’t run on my AMD desktop; it lives over on the FreeBSD NAS instead. There’s a small irony here. Open WebUI is really designed to be run as a Docker container — that’s the blessed, easy path. And I run it about as far from that path as you can get: natively, inside a FreeBSD jail, on top of an emulated Linux. It was more work, but it fits how I wanted the rest of the house organized, and it’s been rock solid. The jail itself is a plain FreeBSD 13.5 jail, created with iocage. The one non-obvious wrinkle is that Open WebUI can’t run on FreeBSD directly, so the jail has FreeBSD’s Linux compatibility turned on — which is what all the linprocfs and linsysfs permissions here are for: iocage create -n openwebui -r 13.5-RELEASE \ ip4_addr="em0|openwebui-ip/24" \ defaultrouter="gateway-ip" \ boot=on \ enforce_statfs=1 \ allow_mount=1 \ allow_mount_linprocfs=1 \ allow_mount_linsysfs=1 \ allow_raw_sockets=1 Getting Open WebUI running inside the jail was the fussiest part of this whole project. My first instinct was to install it on FreeBSD’s own Python — and that went badly. Every time I ran pip install open-webui it would grind for a while and then die on some missing build dependency, so I’d install that piece — Rust, then cmake, then OpenSSL, then libffi, then a Postgres client library — rerun pip, and hit the next one. After a couple of hours of whack-a-mole I gave up on the native path entirely. The fix was to stop fighting FreeBSD and lean on its Linux compatibility instead. I installed a Rocky Linux 9 base (linux_base-rl9) and mounted the Linux proc and sys filesystems that Linux programs expect to find. Then, rather than build a Python myself, I downloaded a prebuilt standalone Linux build of CPython 3.11 (from the python-build-standalone project) and unpacked it into /opt/python. Pointed at pip install open-webui — where ready-made Linux wheels actually exist — that Linux Python installed it cleanly. The whole saga is exactly the kind of thing the official Docker image exists to spare you, which is a little ironic given that leaving Docker behind is what put me here in the first place. One gotcha worth passing along: those Linux proc/sys mounts have to survive a jail restart, or the Linux Python quietly stops working the next time the machine reboots. I made them permanent by adding the mount to the jail’s fstab from the host: iocage fstab -a openwebui "linprocfs /compat/linux/proc linprocfs rw 0 0" To keep it running, I wrote a small rc.d service so the jail starts Open WebUI on boot. Under the hood it just runs open-webui serve on port 8080, wrapped in FreeBSD’s daemon for a pidfile and a log. One environment variable in there is worth calling out: AIOHTTP_CLIENT_TIMEOUT=600 That’s a ten-minute client timeout. With a hosted service, responses come back fast; with a big model running on a single 3090 Ti, a long answer can genuinely take minutes, and the default timeout would hang up on the model mid-sentence. Bumping it to 600 seconds fixed that. The first thing to do once you can reach Open WebUI in a browser is to point it at the models. Open WebUI talks to inference backends through an OpenAI-compatible API, so in its admin settings I set up a Connection to my local inference server at http://inference-server-ip:9292/v1. That’s llama-swap over on the ryzen desktop — from Open WebUI’s point of view it’s just another OpenAI-compatible endpoint, and behind that address llama-swap and llama.cpp do all the swapping and inferring we set up earlier. Web search One thing I really wanted was for my local models to be able to search the web, the way the hosted assistants do. Open WebUI supports this out of the box if you give it a search backend, and the self-hosted option is SearXNG — a metasearch engine that queries the big search engines on your behalf and hands back the results, without the tracking. SearXNG got its own jail, also on the FreeBSD box, right next to Open WebUI. Unlike the Open WebUI jail, this one is completely stock — SearXNG is pure Python and runs on FreeBSD natively, so there’s no Linux layer and none of the extra permissions: iocage create -n searxng -r 13.5-RELEASE \ ip4_addr="em0|searxng-ip/24" \ boot=on Installing SearXNG inside the jail was refreshingly boring — especially next to the Open WebUI saga. Because it’s plain Python with no exotic dependencies, it’s available as a native FreeBSD package, so the whole install came down to pkg install py311-searxng-devel and enabling its service. No Linux base, no standalone Python, no wheels compiled from source. Implement this: setting up SearXNG in the jail # inside the jail (iocage console searxng) pkg install -y py311-searxng-devel # generate a secret key to paste into the config openssl rand -hex 32 # edit /usr/local/etc/searxng.yml: # - set server.secret_key to the value above # - add "json" to search.formats (see below) so Open WebUI can read results vi /usr/local/etc/searxng.yml # enable and start the service (it listens on port 8888) sysrc searxng_enable=YES service searxng start sockstat -l4 | grep 8888 # confirm it's listening The one setting that isn’t optional: by default SearXNG only returns HTML, but Open WebUI needs JSON back, so search.formats in searxng.yml has to include it: search: formats: - html - json Then, in Open WebUI’s admin settings, I pointed web search at that jail: http://searxng-ip:8888/search?q= Now when I ask a local model about something current, Open WebUI runs the search through SearXNG, feeds the results into the model’s context, and I get an answer grounded in today’s web instead of the model’s training cutoff. Appendix: recreating the jail from scratch If you’d like to reproduce this exact setup, here’s the whole thing start to finish, with all my false starts stripped out. It assumes a FreeBSD host with iocage. 1. On the FreeBSD host — create the jail: iocage create -n openwebui -r 13.5-RELEASE \ ip4_addr="em0|openwebui-ip/24" \ defaultrouter="gateway-ip" \ boot=on \ enforce_statfs=1 \ allow_mount=1 \ allow_mount_linprocfs=1 \ allow_mount_linsysfs=1 \ allow_raw_sockets=1 iocage start openwebui 2. Inside the jail — the Linux base and the filesystems it needs: iocage console openwebui # Rocky Linux 9 userland: the linuxulator compatibility layer pkg install -y linux_base-rl9 # Linux binaries expect /proc and /sys; create and mount them mkdir -p /compat/linux/proc /compat/linux/sys mount -t linprocfs linprocfs /compat/linux/proc mount -t linsysfs linsysfs /compat/linux/sys 3. Back on the host — make those mounts survive a reboot: iocage fstab -a openwebui "linprocfs /compat/linux/proc linprocfs rw 0 0" iocage fstab -a openwebui "linsysfs /compat/linux/sys linsysfs rw 0 0" 4. Inside the jail — a self-contained Linux Python, then Open WebUI. No FreeBSD Python, Node, or build toolchain required; a standalone Linux CPython plus prebuilt Linux wheels does it all: fetch -o /tmp/python.tar.gz \ https://github.com/astral-sh/python-build-standalone/releases/download/20240726/cpython-3.11.9+20240726-x86_64-unknown-linux-gnu-install_only.tar.gz mkdir -p /opt/python tar xzf /tmp/python.tar.gz -C /opt/python --strip-components=1 /opt/python/bin/pip3 install open-webui 5. Inside the jail — the rc.d service. Save this as /usr/local/etc/rc.d/openwebui: #!/bin/sh # # PROVIDE: openwebui # REQUIRE: NETWORKING # KEYWORD: shutdown . /etc/rc.subr name="openwebui" rcvar="openwebui_enable" pidfile="/var/run/${name}.pid" logfile="/var/log/${name}.log" procname="/opt/python/bin/python3.11" command="/usr/sbin/daemon" command_args="-f -p ${pidfile} -o ${logfile} /usr/bin/env DATA_DIR=/app/backend/data AIOHTTP_CLIENT_TIMEOUT=600 AIOHTTP_CLIENT_TIMEOUT_MODEL_LIST=10 /opt/python/bin/open-webui serve --host 0.0.0.0 --port 8080" load_rc_config $name : ${openwebui_enable:="NO"} run_rc_command "$1" Then enable and start it: chmod +x /usr/local/etc/rc.d/openwebui sysrc openwebui_enable="YES" service openwebui start Open WebUI is now live on http://openwebui-ip:8080. The last step is in its web admin panel: add an OpenAI-compatible connection pointed at http://inference-server-ip:9292/v1 (llama-swap on ryzen), and set the SearXNG search URL to http://searxng-ip:8888/search?q=
I understand that it may not be appropriate to call it “officially accepted” yet because of the wording used in the notification, and I also saw on Twitter/X that they said they are working on it. However, it has already been around three weeks since then, and we have already submitted the camera-ready version. Registration, visa applications, travel planning, and funding requests all depend on this confirmation. For some people, it is difficult or even impossible to request funding without an official acceptance letter or clear confirmation. I really hope the organizers can handle this more professionally and be more considerate of authors who need proper documentation for administrative purposes. submitted by /u/National-Resident244 [link] [Kommentare]

Large language models (LLMs) have exploded in popularity due to their new generative capabilities that go far beyond prior state-of-the-art. These technologies are increasingly being leveraged in various domains such as law, finance, and medicine. However, these models carry significant computational challenges, especially the compute and energy costs required for inference. Inference energy costs already receive less attention than the energy costs of training LLMs -- despite how often these large models are called on to conduct inference in reality (e.g., ChatGPT). As these state-of-the-art LLMs see increasing usage and deployment in various domains, a better understanding of their resource utilization is crucial for cost-savings, scaling performance, efficient hardware usage, and optimal inference strategies. In this paper, we describe experiments conducted to study the computational and energy utilization of inference with LLMs. We benchmark and conduct a preliminary analysis of the inference performance and inference energy costs of different sizes of LLaMA -- a recent state-of-the-art LLM -- developed by Meta AI on two generations of popular GPUs (NVIDIA V100 \& A100) and two datasets (Alpaca and GSM8K) to reflect the diverse set of tasks/benchmarks for LLMs in research and practice. We present the results of multi-node, multi-GPU inference using model sharding across up to 32 GPUs. To our knowledge, our work is the one of the first to study LLM inference performance from the perspective of computational and energy resources at this scale.