D
↗
D
↗
Primate 0.40: Route pages, store enums, async schemas and events01 July 2026 by terrablueToday we're announcing the availability of the Primate 0.40 preview release. If you're new to Primate, we recommend reading the quickstart page to get started. Collocated route pages Primate 0.40 supports collocated route pages. Instead of importing a component from views and passing it to response.view, a route can render the frontend file next to it with response.page. TypeScriptroutes/post/[id].ts import response from "primate/response"; import route from "primate/route"; export default route({ get(request) { return response.page({ id: request.path.get("id") }); }, });The frontend file has the same basename as the route, only a different extension. React Angular Vue Svelte Solid Markoroutes/post/[id].tsxroutes/post/[id].component.tsroutes/post/[id].vueroutes/post/[id].svelteroutes/post/[id].tsxroutes/post/[id].marko import type route from "./[id]"; export default function Post(props: typeof route.get.Page) { return Post {props.id}; } import type route from "./[id]"; import { Component, input } from "@angular/core"; type Props = typeof route.get.Page; @Component({ template: `Post {{ id() }}`, }) export default class Post { id = input.required(); } import type route from "./[id]"; type Props = typeof route.get.Page; const props = defineProps(); Post {{ props.id }} import type route from "./[id]"; const props: typeof route.get.Page = $props(); Post {props.id} import type route from "./[id]"; export default function Post(props: typeof route.get.Page) { return Post {props.id}; } import type route from "./[id]"; export interface Input { id: typeof route.get.Page["id"]; } Post ${input.id}The route handles data loading, validation, redirects and status codes; the page handles rendering. Typed props without declarations The component examples above use typeof route.get.Page for their props. That type comes from response.page(...), so the route response is the source of truth and there's no separate interface to keep in sync. Layout pages Layouts can be collocated too. TypeScriptroutes/admin/+layout.ts import response from "primate/response"; import route from "primate/route"; export default route({ get() { return response.page({ section: "Admin" }); }, });As with normal routes, add a component alongside the layout with the same basename. React Angular Vue Svelte Solid Markoroutes/admin/+layout.tsxroutes/admin/+layout.component.tsroutes/admin/+layout.vueroutes/admin/+layout.svelteroutes/admin/+layout.tsxroutes/admin/+layout.marko import type route from "./+layout"; export default function Layout( props: typeof route.get.Page & { children: React.ReactNode }, ) { return {props.children}; } import type route from "./+layout"; import { Component, input } from "@angular/core"; type Props = typeof route.get.Page; @Component({ template: ``, }) export default class Layout { section = input.required(); } import type route from "./+layout"; type Props = typeof route.get.Page; const props = defineProps(); import type route from "./+layout"; const props: typeof route.get.Page & { children: any } = $props(); {@render props.children()} import type route from "./+layout"; import type { JSX } from "solid-js"; export default function Layout( props: typeof route.get.Page & { children: JSX.Element }, ) { return {props.children}; } import type route from "./+layout"; export interface Input { section: typeof route.get.Page["section"]; renderBody: Marko.Body; } The matching layout page receives those props plus its children. This keeps route-specific UI close to the route while preserving the existing views directory for shared components and explicitly named views. Store enums In Primate 0.40, p.enum participates in stores. No more juggling a p.u8 column and a separate hand-rolled constants object that you hope stays in sync. One declaration is fully validated, fully typed, and carries the enum names with the schema. // stores/Account.ts import db from "@/config/db"; import p from "pema"; import store from "primate/store"; const Status = p.enum({ UNCONFIRMED: 0, CONFIRMED: 1, }); export default store({ table: "account", db, schema: { id: store.key.primary(p.u32), email: p.string, status: Status, created_at: p.date.default(() => new Date()), }, }).extend(_Account => ({ Status, }));Then anywhere else in your app: import Account from "@/stores/Account"; const account = await Account.insert({ email: "john@example.com", status: Account.Status.UNCONFIRMED, }); if (account.status === Account.Status.CONFIRMED) { // ... }This removes a few common sources of drift. Plain storage p.enum is backed by p.u8 under the hood, so it stores as a plain integer from 0 to 255. There are no dialect-specific enum types and no CHECK constraints to babysit across SQLite, Postgres and MySQL — it rides on u8's existing column mapping. Membership validation p.u8 alone happily accepts 7 for a two-value enum. p.enum validates membership too: only declared values pass. One declared value The enum is the field, not a sibling constant you remember to update. Account.Status.CONFIRMED is generated straight from the schema, not duplicated by hand. Reverse lookup Account.Status.nameOf(account.status) gets you "CONFIRMED" back when you need the name, not just the number. Derived and async schemas Pema schemas can now derive a parsed value into a different value. Use .derive(...) when parsed input should be normalized before the handler sees it. import p from "pema"; const FullName = p({ first: p.string, last: p.string, }).derive(({ first, last }) => `${first} ${last}`); const name = FullName.parse({ first: "John", last: "Adams" }); // name is "John Adams"This works anywhere a Pema schema is accepted. For request bodies, the derived type flows into the route handler. import p from "pema"; import route from "primate/route"; const Body = p({ name: p.string, }).derive(({ name }) => name.toUpperCase()); export default route({ post: route.with( { body: Body, contentType: "application/json" }, async request => { const name = await request.body.json(); // name is string return name; }, ), });Primate 0.40 also supports p.async(...) for object schemas that need async post-processing. Its parse(...) method always returns a promise, and async derives compose just like sync derives. import p from "pema"; const User = p.async({ id: p.string, }).derive(async ({ id }) => { return await loadUser(id); });Async schemas are supported in route.with(...) for bodies and path parameters. For path schemas, p.async(...) keeps the object shape visible so Primate can still check that route parameters and schema properties match at build time. // routes/user/[id].ts import p from "pema"; import route from "primate/route"; const Path = p.async({ id: p.string, }).derive(async ({ id }) => ({ id: await resolveUserId(id), })); export default route({ get: route.with({ path: Path }, request => { return request.path.get("id"); }), });Use regular .derive(...) for synchronous transformations. Reach for p.async(...) when the schema has to await I/O, lookup data, or perform another async normalization step before the handler sees the value. Events and simpler SSE cleanup response.sse now uses a single setup function instead of separate open and close callbacks. Return a cleanup function to stop timers or unsubscribe when the browser disconnects. import response from "primate/response"; import route from "primate/route"; export default route({ get() { return response.sse(source => { const timer = setInterval(() => { source.send("tick", Date.now()); }, 1000); return () => clearInterval(timer); }); }, });Primate 0.40 also includes primate/events, an in-memory channel helper for keyed subscriptions. // services/DeploymentEvents.ts import events from "primate/events"; type DeploymentEvent = { type: "step"; key: number; status: "running" | "done" | "error"; }; export default events.channel();Emit with a key, subscribe with the same key, and return the unsubscribe function from response.sse. return response.sse(source => { return DeploymentEvents.subscribe(deployment.id, event => { source.send(event.type, event); }); });Channels are intentionally local to one server process. They do not persist events or broadcast across multiple running instances. Minor improvements App imports move to @/ New Primate apps now use a single @/* TypeScript path alias for application imports instead of the previous family of # aliases. This avoids collisions with package-internal import maps and makes app imports read like regular project-root imports. { "compilerOptions": { "baseUrl": "${configDir}", "paths": { "@/*": ["*"] } } }Existing imports map directly to their project folders: import app from "@/config/app"; import db from "@/config/db"; import View from "@/views/Post"; import route from "@/routes/post"; import User from "@/stores/User";This replaces app-level imports like #app, #db, #lib/*, #view/*, #route/*, and #store/*. HTML templates move to templates Primate's HTML shell files now live in templates instead of pages. This frees up the term "page" for collocated route pages while making the existing concept clearer: these files are document templates, not route pages. templates/app.html templates/error.htmlThe render option has been renamed in the same spirit: return response.view(View, props, { template: "admin.html" }); return response.error({ template: "error.html" });New apps generated with npx primate init use templates/app.html, and the old pages directory is no longer part of the app structure. Autoapplying migrations Primate can now autoapply migrations in production. To activate this, add autoapply: true to your configuration: import config from "primate/config"; import db from "@/config/db"; export default config({ db: { migrations: { table: "migration", db, autoapply: true, // default is false }, }, });Migrations are then automatically applied when you run node build/server.js in production. There's no need to run npx primate migrate:apply before running the server. This removes the need to rely on node_modules or a package manager in production. You can copy the contents of build to your deployment server and run your app with Node, Deno or Bun. If you're crossbuilding, consider also setting --target=node, --target=deno or --target=bun; see Crossbuilding in the Primate 0.39 release notes. Fin If you like Primate, consider joining our Discord server or starring us on GitHub.
 V
↗
V
↗
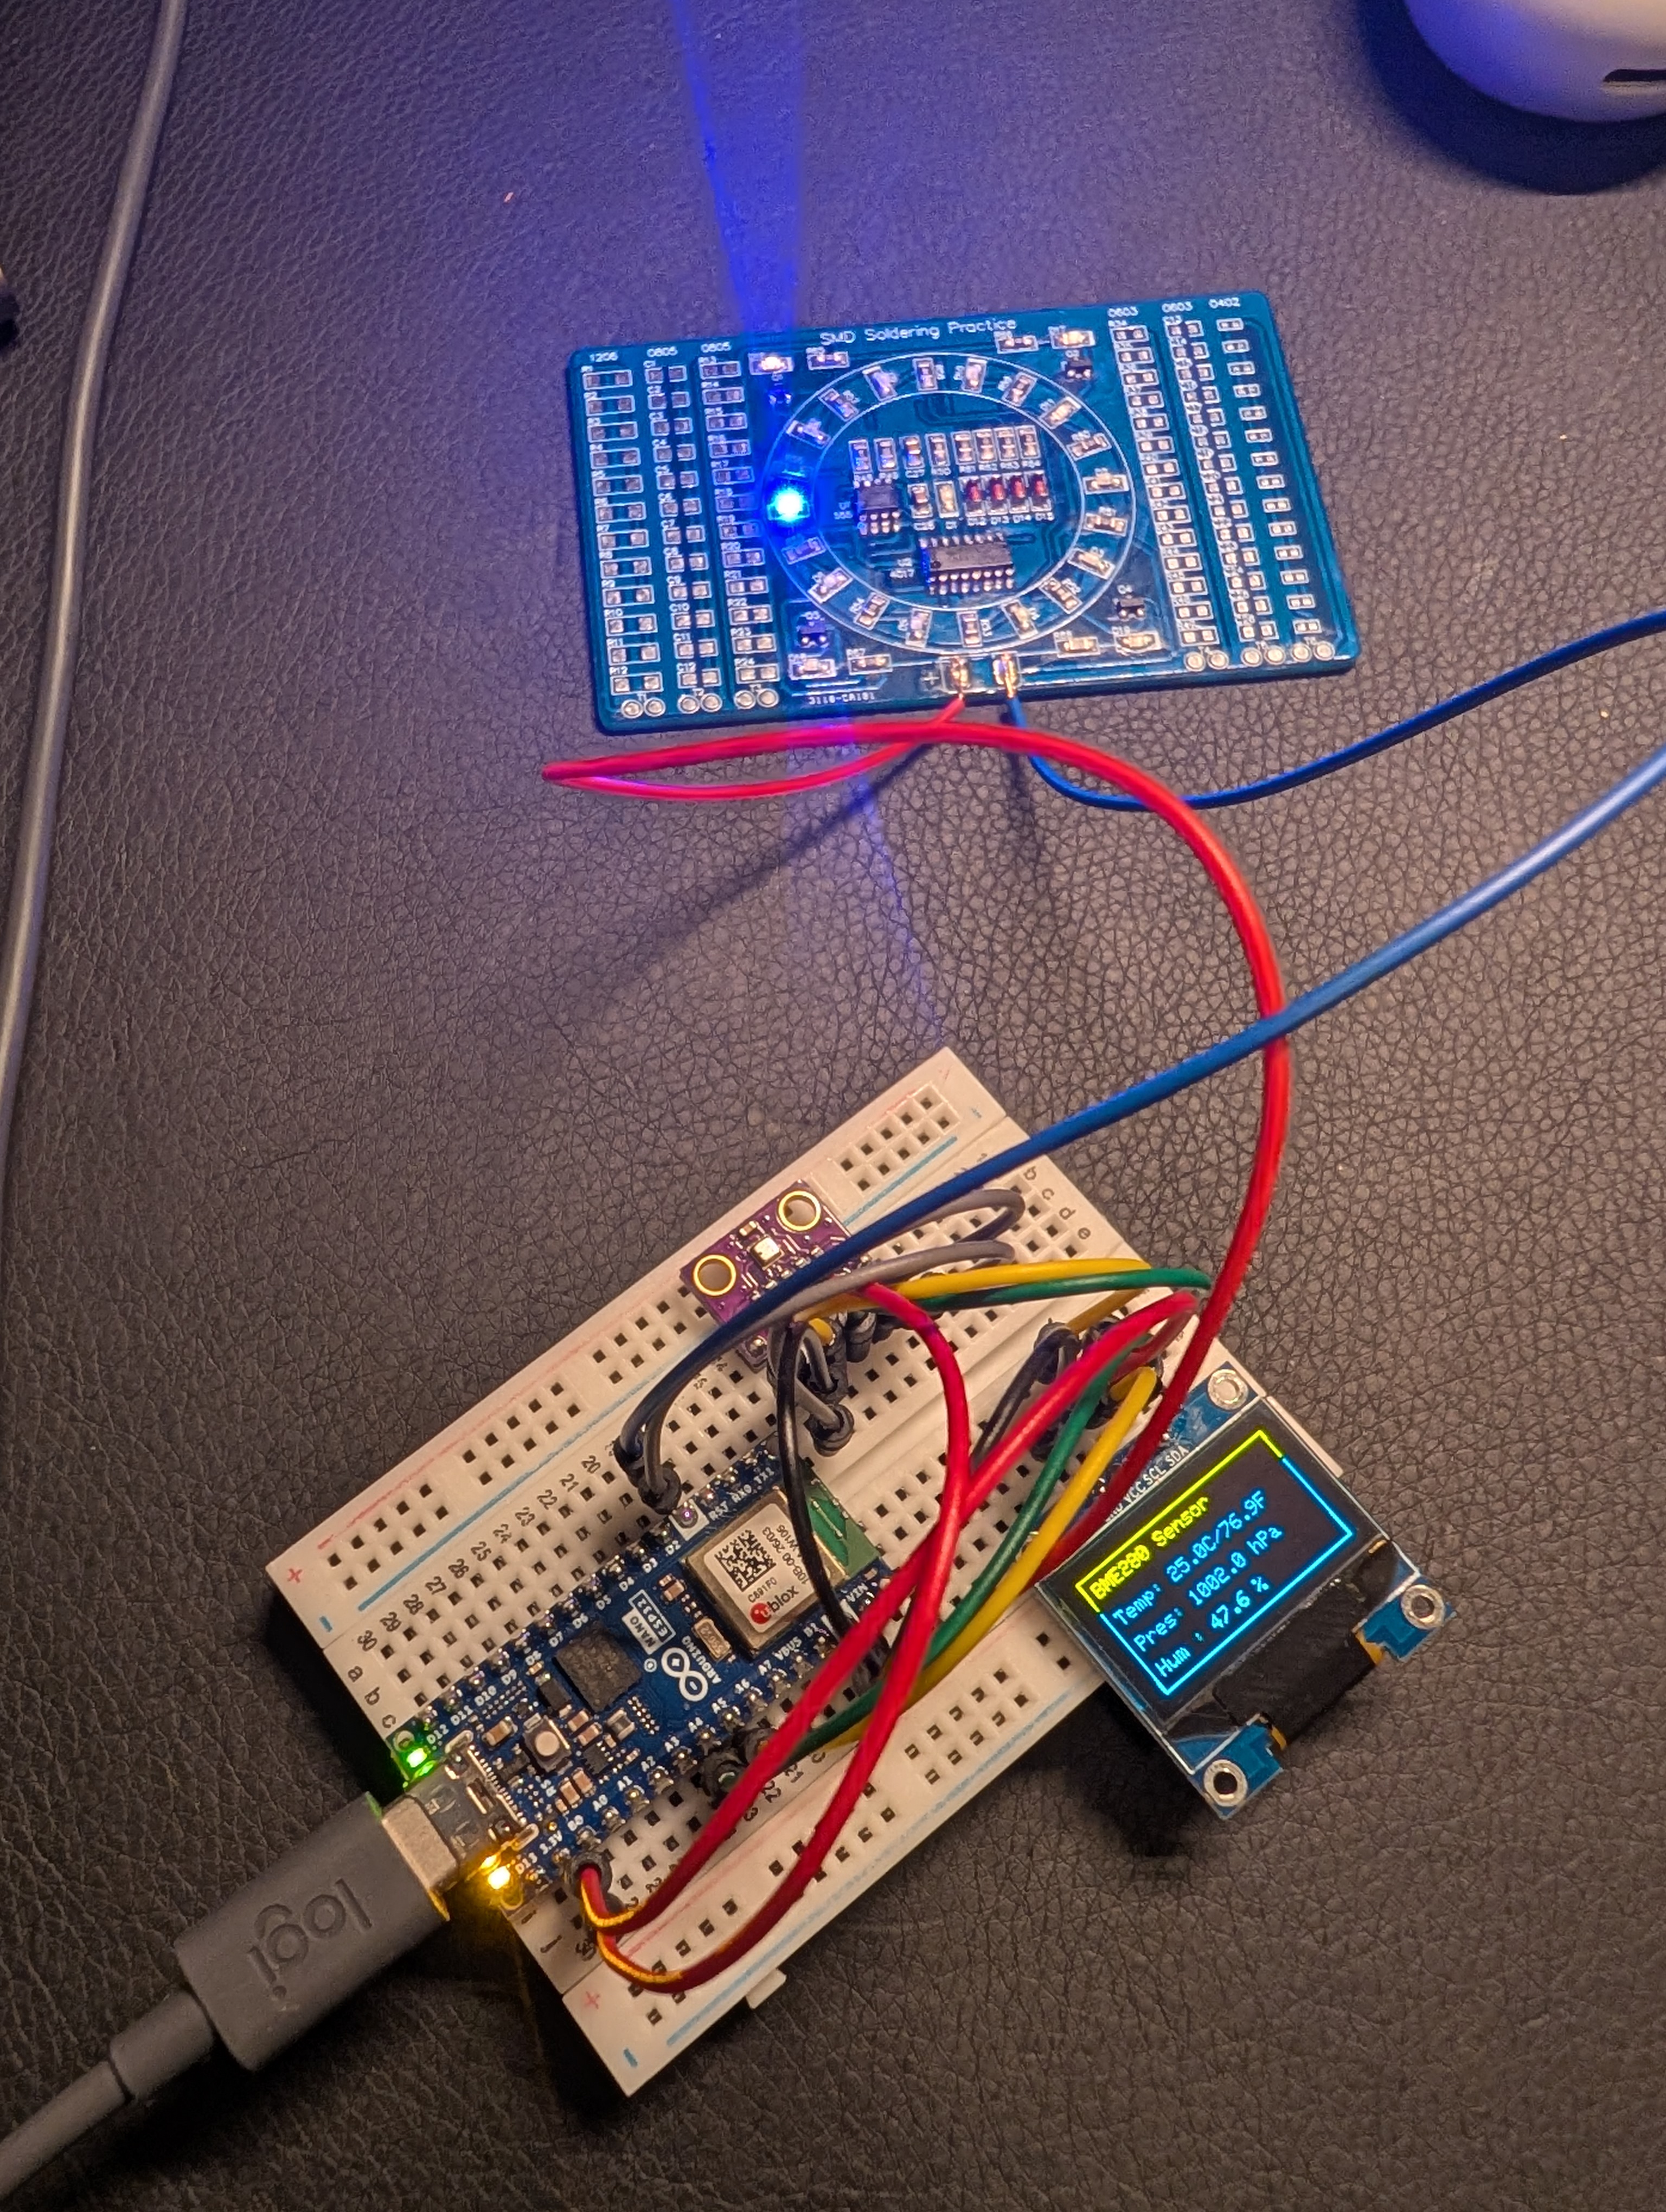
Designing and assembling my first PCB Published: July 11, 2026 The beginning About a couple months ago I purchased an Arduino Nano ESP32 dev board. I had this sudden itch and I wanted to play around with hardware. I don't really have much experience in this space, besides working on firmware for an IoT company over a decade ago, but I've written tons of software over the years. I was very surprised how quickly I was able to get the built-in LEDs to blink with Arduino IDE and some help from LLMs. After that I moved on to figure out how to build and flash firmware directly from the command line without having to deal with all these custom abstractions. I like operating from CLI. That was also somewhat easy and gave me confidence that I can go back to my normal tools (nvim) for working with code. The devboard itself does not have much going on. Next was getting some peripherals so I ordered a small LCD and BME280 temperature/humidity sensor breakout boards. Both of these I was able to wire up to the ESP32 chip and get them to talk over the I2C protocol. Figure 1: Playing around with Arduino Nano and random things attached to it via breadboard. Naturally, we cannot continue assembling pre-existing modules for a variety of reasons. I think they are great for prototyping, but I like getting out of the prototyping phase as soon as possible and getting into a more "release" or "production" workflow. I was thinking maybe I should recreate the Arduino board with all these components hardwired so I can ditch the breadboard. That sounded great, but it felt a little bit ambitious. There's lots of components and it would make it hard for me to test everything. Instead, I decided to create the BME280 sensor module. This would let me get a feel for what it takes to design something starting with schematics and ending up with a custom PCB. In the picture above you can see the small brown board that I got from Amazon, that's a BME280 sensor board which only has a handful of components. If everything goes as planned I should be able to swap-in my custom board and everything should continue working as before. That was the plan. Schematic and PCB design There seem to be several tools available for schematic/pcb design. I needed something that's free and runs on Mac OS. Some people praise EasyEDA, others like KiCad. I didn't do much research on this topic, it seemed like either of them would fit the bill, but I picked KiCad since it's free GPL licensed software. All sensors, chips and components come with what's called a datasheet. A datasheet is a technical document made available by the manufacturer describing how the component functions, at what temperatures it can operate, reflow (soldering) temperature curves, size and exact dimensions, example wiring and many other things depending on the component. For my sensor module, I needed to wire the BME280 for an I2C interface to make it plug-and-play. The module that I purchased from Amazon actually supports both I2C and SPI. So what I'm doing is not an exact copy, but actually a more narrow implementation. The BME280 datasheet has pin-out and connection diagrams starting on page 38. It actually provides examples for both SPI and I2C connections. I took the provided I2C connection diagram and transferred it to KiCad. Figure 2: Schematic design of my sensor module. I wouldn't call KiCad the most intuitive application for first-time users. However, I was able to draw up the exact schematic as was shown on the datasheet. To transfer a schematic to a PCB you need to select what's called a footprint for each component. For example, there's only one type of BME280 sensor and it really has only one shape/size (aka footprint) available. That's not the case for other types of general use components such as resistors or capacitors. What footprints you pick will dictate the size of your board, how easy it is to assemble and most likely many other factors that I'm not aware of (such as heat dispersion). Through my research I discovered that most commonly you're going to encounter SMD and THT components. THT or through-hole components are more old-school looking tech (though it's not old), generally larger in size and they get installed by pushing component legs through the holes in the PCB and soldering the legs to the board after. This can be done in most cases with a regular soldering iron. SMD stands for surface mounted devices and are what you'd find in almost all modern electronic devices. They are much smaller in size, and as the size gets smaller, they will require more specialized equipment for installation. When I started looking at the footprint library in KiCad I got very confused because it wasn't immediately clear to me whether I needed to find a footprint for the exact component brand that I was planning to use or not. Lots of general SMD components have standardized footprints, I discovered. They follow standard codes like 1206, 0805, 0603, etc which translate to dimensions 0.12" by 0.06" or (3.2mm x 1.55mm) for a 1206 component. I went with the 0805 size as this seemed to be suitable for hand soldering, though it's pushing the limits. After you assign a footprint for each component you can then import them into the PCB editor and layout your PCB. Figure 3: My sensor module in KiCad PCB editor. Figure 4: Module 3D preview. The layout process did not seem too complicated, however, you need to be aware of how you are routing the connections, or they could otherwise prevent other ones from getting to their destination. I was able to layout everything on the front layer of the board. The only thing I did special (maybe that is not so special) was ground filling empty space on the front and back and then connecting front to back using via. This seems to be a common pattern used in the PCB design. Otherwise, it can get really tricky to route the connections without blocking other ones, even for a small simple board like the one I'm making here. Sourcing components and ordering PCB The component search was somewhat interesting too. I purchased my components from DigiKey. Although, it's probably best to have accounts with several electronics shops, just in case there's a limited inventory. I was able to find all components on DigiKey except for the BME280 sensor itself. The BME280 sensor was out of stock on several sites and it looked like it would take several months to get the backorder processed. I skipped the BME280 and decided to rip it off from the Amazon module I purchased earlier. The resistors and capacitors were somewhat easy to find, I just had to be careful picking the correct footprint and configuration (resistance etc). KiCad also lets you generate a bill of materials (BOM). It's just a list of components and their configuration and where they need to be placed. The PCB manufacturers can sometimes perform the assembly for you if you provide them with the BOM. I did not do that, I wanted to hand assemble to get a feel for it. Figure 5: BOM. To order a PCB you need to export gerber and drill files. The gerber files define trace layout and the drill file is for the CNC machining. I exported both of these with default settings and packaged them into a zip file which I then provided to JLCPCB. From there you finish the order form. I did not make many changes and used defaults. JLCPCB is a Chinese company, order to door took about 2-3 weeks and cost me under $10 dollars. There are faster options, but they would break the bank on delivery costs. My tools and assembly As part of my current homelab, I only have two soldering tools plus a multimeter. Hakko FX888DX-010BY Figure 6: Hakko FX888DX-010BY soldering iron. I purchased this iron because it lets you control the temperature and it has pretty good reviews. It heats up really fast. I usually run my iron at 650F. However, temperature adjustment is critical so you know exactly what temperature you're getting so you don't damage the components. Quick 861DW Figure 7: Quick 861DW hot air station. This device is called a hot air station, sometimes reflow or rework station. It is used heavily in electronics repair shops to replace components. You also can use it to solder SMD components. Once you go below 1206, using a soldering iron gets tricky. The way SMDs get soldered is by spreading solder paste over connections, placing the components on top and then microwaving the board using a hot plate or hot air gun to melt the solder. The hot air gun is the most versatile tool and it's good for smaller assembly. I picked up a Quick 861DW because it's considered a pro entry-level device (according to LLMs at least). The most important part for a device like this is airflow control. I run this device on airflow setting 15 (which is very low volume) and 250C. SMDs are tiny and very light devices, anything that does not give you good air control will blow away the components. The assembly It took me about 15 minutes to assemble the board. That involved desoldering the BME280 sensor from the Amazon board, applying solder paste and laying out the components and soldering everything up. The only thing I struggled with was the sensor. The sensor is tiny and it has 8 connection pads underneath it so I wasn't sure if I would short any of the connections by accident because I couldn't see what was going on under the chip. I kept the area for the sensor clean and made sure there was flux on it and I left the rest to the surface tension gods. Figure 8: My board vs board from Amazon. The results I was giving this whole thing a 50/50 chance of working on the first try. I wasn't even sure if I routed everything correctly on the PCB. The "via" and grounding were a bit confusing. Then, soldering the sensor was slightly tricky and I wasn't sure if I shorted connections anywhere. However, to my surprise, the board I designed and assembled was plug-and-play on the first try! Figure 9: My sensor board is working. I did not have to modify the firmware, I did not have to put anything in between the board. It was literally a plug-and-play experience because I exposed the same I2C interface that I used originally. This experience gave me confidence that I can produce custom and working PCBs. This, of course, was a very simple project, but it took me through the whole process end-to-end. It gave me a better understanding of the steps I may need to take for more complex designs. I was thinking maybe for the next one I should place the LCD, ESP32 and BME280 on a single board, hardwired. This one sounds a bit more complex. How do you flash the chip? How do you supply power? What is necessary and what is not? For example, the Arduino Nano dev board has lots of components on it. Are all of them needed? I have no idea. I will see what I'll do next, but I enjoyed this experience.
 G
↗
G
↗
Docs » Welcome to xs’s documentation! View page source Welcome to xs’s documentation!¶ xs is a dynamically typed, dynamically scoped, concatenative array language inspired by kdb+/q and released into the public domain. The interpreter and builtin functions are written in OCaml. The name “xs” either stands for: eXtra Small The plural of “x” Check out the project page on github if you wish to browse the source, open an issue or pull request. xs aims to be a small language with a focus on compactness and expressiveness. Or email me at sturm@cryptm.org Installation Examples Tutorial Introduction Comments Function and Variables Operators Lists Scoping Data Types Day 1 Advent of Code 2019 Solution Language Reference Command-Line Parameters Syntax Data Types Parsing Scoping Math neg unary negative + addition - substraction * multiplication % division mod modulus ** power ln natural logarithm sin sine cos cosine tan tangent sum sum of list sums partial sums of list prod product of list prods partial products of list abs absolute value ceil ceiling floor floor Boolean and Conditionals == equals < less than > greater than gq greater or equal lq less or equal && And || Or if if expression cond multiple conditional every tests all true any any true cmp comparison Stack Manipulation dup duplicate element swap swap elements drop drop value Function Application . apply $ swap and apply Assignment : set/print ~ peek set/print :: reassign Iterators and Accumulators ' map '' map2 / fold \ scan fix fixpoint fixes partial fixpoints do iteration List and String [] make list enlist make list ^ delist til construct numbered list len length of list flip flip list rev reverse , concatenate ,, cons lower lowercase string upper uppercase string Indexing, Reshaping, Changing @ get ? find where # take _ drop cut reshape cat concatenate all cats partial concatenate all Set Operations in contains inter intersection union uniq unique elements Sorting asc sort ascending dsc sort descending sort custom sort Types of type conversion type sv scalar from vector vs vector from scalar I/O open open file read read data write write data seek change file position close close file handle readl read lines writel write lines Misc rand random value include evaluate file measure elapsed time eval evaluate
 F
↗
F
↗
The moment you start treating your customers as captives, they begin to make other plans. It might take a while, but they always end up leaving. The first step is warning away their friends. On the…
 F
↗
F
↗
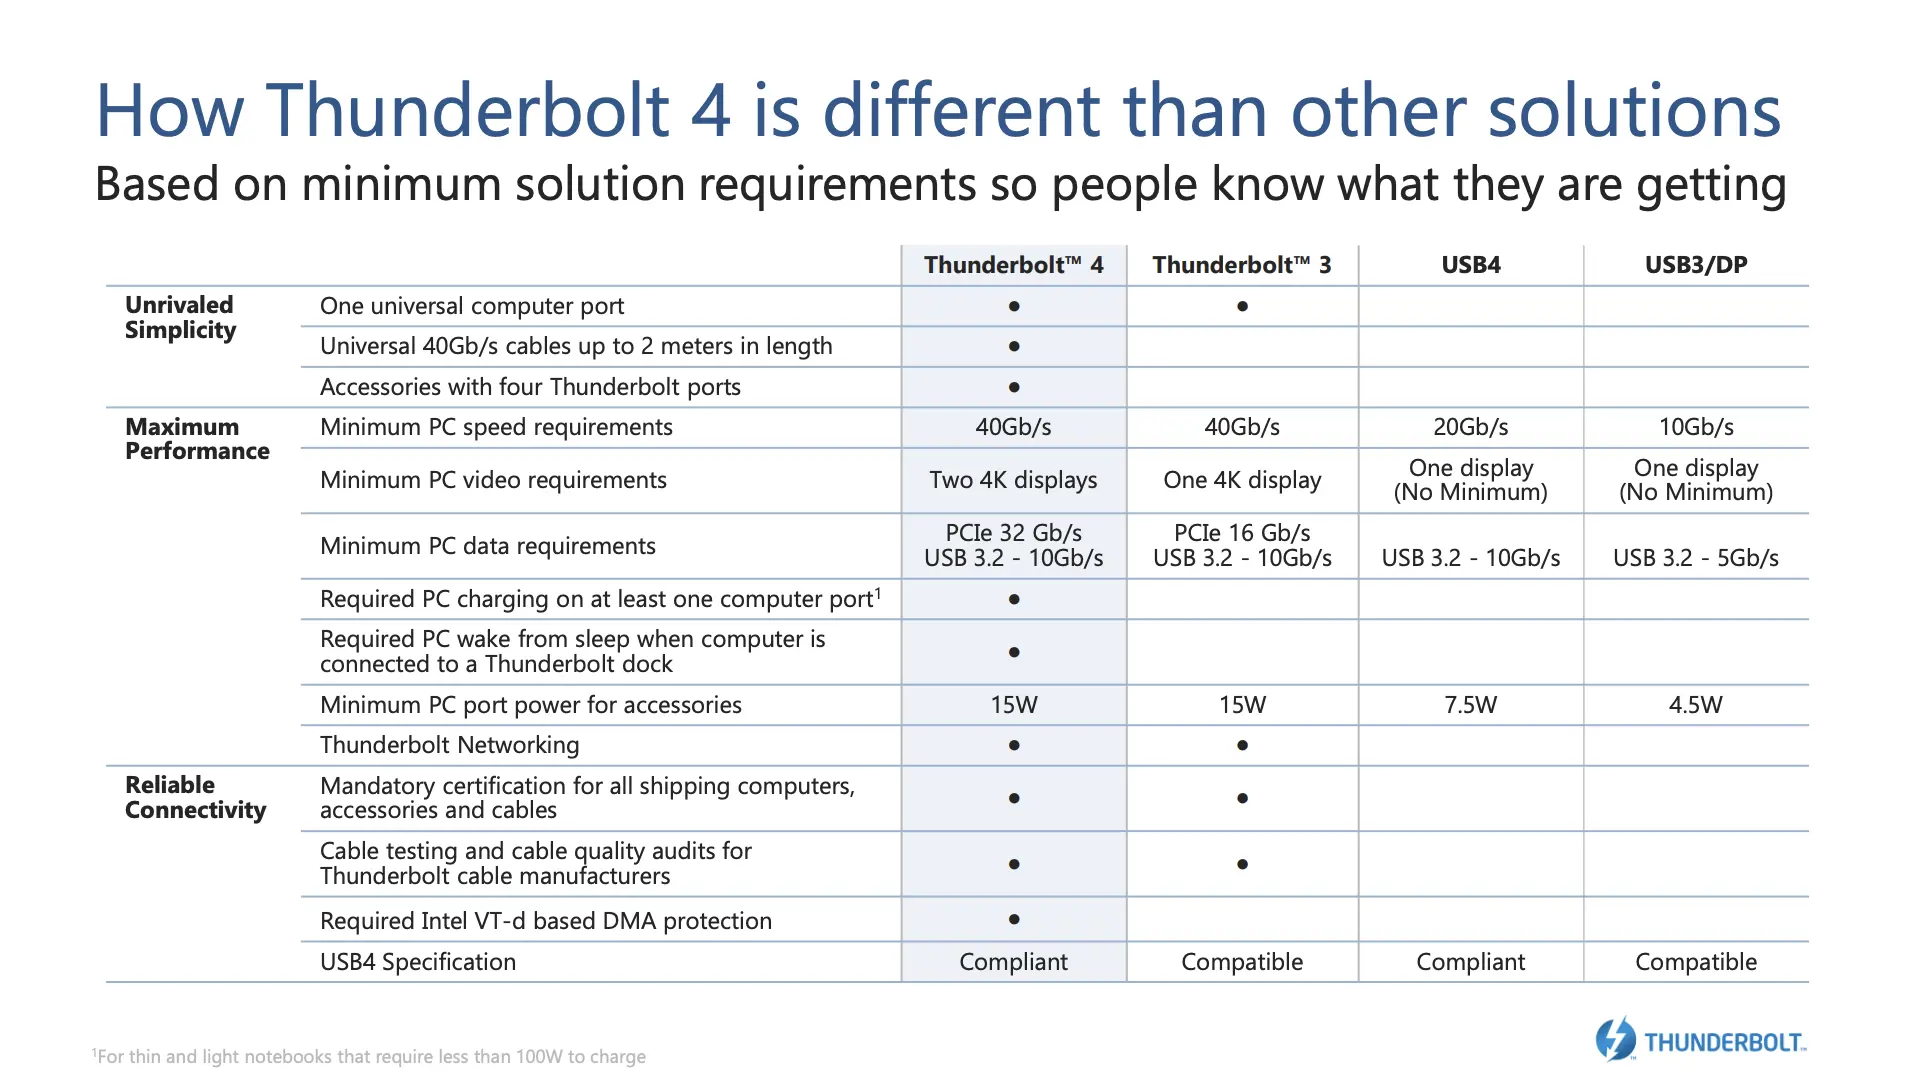
For a long time, my top hardware frustration was to deal with a docked laptop that wouldn't wake up. It was sporadic but the scenario would be as follows. Even the best Thunderbolt dock at the time, the CalDigit TS3, would occasionally fail to wake up the system. It was super annoying. When Thunderbolt 4 was announced in 2020, I was ecstatic. Intel's Thunderbolt 4 Announcement Press Deck specifically mentioned solving my very problem with a section stating Required PC wake from sleep when computer is connected to a Thunderbolt dock. That meant the behavior was part of the (reportedly thorough) conformance test suite. I got the CalDigit TS4 as soon as it was released, in 2022. It was perhaps a little bit better but overall I was disappointed to still sometimes encounter a machine that would not wake up. At this point, I had pretty much given up and filed Thunderbolt's "wake from sleep" promise in the "unreliable" folder, right next to Bluetooth Pairing. Fast forward to 2025, when I needed to replace my aging BenQ and its dead pixels. I purchased an ASUS ROG Swift (PG27UCDM), mostly to see what the 240 Hz fuss was about ... and "wake up" became reliable. Since I switched the monitor, I have never experienced a failure. The system works perfectly, flawlessly waking the laptop and bringing the desktop online in under a second. To this day, I have no idea why it works. Maybe the old Ben-Q firmware was buggy. Maybe it simply took too long to wake up. I still have the same MacBook Pro 16" M1 Max and ThinkPad X1 Carbon Gen 9, did they receive firmware updates? Either way, I thought I'd share the details of my configuration, in case someone else is dealing with the same frustration.
 P
↗
P
↗
Learned helplessness, the failure to escape shock induced by uncontrollable aversive events, was discovered half a century ago. Seligman and Maier (1967) theorized that animals learned that outcomes were independent of their responses-that nothing they did mattered-and that this learning undermined …