 Y
↗
Y
↗
Table of ContentsTable of Contents AI disclosure: All bugs are 100% human made.It seems I have just built the world’s first open source switch ASIC and I am getting it back from the fab mid november.Switch floorplan render with area density view enabled, occupying 711.2 x 325um of area. The first version of this chip is currently taped out on the Tiny Tapeout gf26b shuttle chip, part of the second wafer.space run. Silicon bring-up is expected to start 2026-11-15.Here is its repository :Essenceia/ethernet_switch_asicOpen source sillicon for a 100Mbps unmanaged cut-through ethernet switch.Verilog50Buckle up and welcome to the tale of more madness.Recommended soundtrack for reading: Taishi - Reverie for Another SphereWhere are the open source networking ASICs?#Recent FCC decisions have put the central importance of networking equipment top of mind, and in doing so, have also put the total absence of any entirely open source networking equipment hardware at the top of my mind.Although Open Source Silicon is in its infancy we are currently seeing a number of projects being designed, tested, and for the most ambitious ones, even taped-out with some proven silicon already in the wild.Awesome Kian-V project, a silicon proven RISC-V SoC fabbed on wafer.space run 1. And yes, it runs Linux. Link to the original post.That said, the vast majority of the most ambitious projects are predominantly RISC-V SoCs.Surprisingly, there has been much less interest in building open hardware for networking equipment.Well .. unsurprisingly actually … networking equipment is far less “sexy” than CPUs and has thus received much less attention from the open source community. On the other hand, this means there’s a huge untaped boulevard of projects open to anyone with more time than common sense to build open source networking equipment chips!Because, on the other side of the great silicon divide, the world of open source networking equipment is actually quite rich, both in terms of its flourishing software ecosystem and the open PCB/electronics ecosystem, with a flurry of fully featured open source routers available. Yet, due to the current ecosystem’s limitations, under the hood, these are all still all running closed-sourced, blackbox proprietary chips for the central compute and routing tasks.So what would it take to build a router chip?It’s a very ambitious project, since a router involves a complex SoC needing both a powerful enough CPU to run the networking stack alongside specialized networking hardware, and analog frontends for the wired and wireless connections. Since building a full router outright is much too ambitious of a greenfield project for a single person to ever hope to pull off, let’s begin with a more approachable first step: building a switch. After all, although most people only have one router, you can have a number of smaller switches, and we also don’t have any open source chips for those.Oh and, I am not talking about building an FPGA switch, oh no, I am talking about building a switch ASIC, taping it out and then proving the silicon works.Switch Flavors#Before we start figuring out what kind of switch we want to build, let me give you a quick overview of the different flavors of switches out there. Readers deeply familiar with networking equipment can skip this part.Glossary#Physical Layer#Ethernet supports multiple physical layers, outlined in the 802.3 IEEE spec. Each clause in the spec defines the underlying medium characteristics for carrying the Ethernet protocol over the medium at a given bandwidth.Both a 10 Gb fiber Ethernet link and a 10 Mb coaxial cable can carry Ethernet packets and, to the layers above the physical layer, the packets will look exactly the same.Where they will differ is at the physical layer and, outlined in the spec is precisely how, with which timing and with what encoding data will be transmitted over the medium.This ensures that devices made by different manufacturers agree on what “talking Ethernet” looks like, making them interoperable.So one of the first questions I must answer is which physical layer my switch should support. This will define how much traffic I must route, how fast I should do so and how much bandwidth I can carry.Managed vs Unmanaged#The second question is: what type of switch do I want to build?There are two big families of switches: managed and unmanaged. As the name implies, managed switches can be configured and managed from the outside. This allows for much smarter routing, such as supporting different VLANs.While unmanaged switches are essentially unconfigurable pieces of networking equipment that you plug into your network and just work (until power surge do you part).Cut-through vs Store-and-Forward#The last switch characteristic is cut-through versus store-and-forward.Cut-through switches start forwarding a packet while the packet is still arriving, leading to much lower networking latency, whereas store-and-forward switches wait for the entire packet to arrive before checking that no corruption has occurred, and then only forward the packet if that check passes.Where issues arise is when a packet is corrupted, a cut-through switch might still forward it, propagating corrupted packets through the network since forwarding began before the FCS (frame check sequence) could be checked.Designing against constraints (again)#As usual with my ASIC design work, what I build is shaped as much by what I want to build as it is by the constraints of the silicon.Pins#My first major constraint is the pins: not only in their amount but also in their maximum bandwidth.Since I will be taping this first generation chip out over the Tiny Tapeout shuttle chip, using purely digital tiles, I’m constrained by the limits of these pins.In total this will afford me 8 input, 8 output, and 8 bi-directional GPIO pins, rated to run reliably at 50 MHz on both inbound and outbound data.The absence of any analog front end makes building anything IEEE-physical-layer-compliant directly a challenge, but there’s a way around this: using an external PHY (physical layer) chip and interfacing with it over the standardized RMII bus. Though this consumes 7 bits per Ethernet interface it makes my 50Mbps pins capable of sending and receiving over 100Mbps Ethernet (100BASE-TX).Tiny Tapeout shuttle chipIndexInputOutputBidirectional0ui[0]uo[0]uio[0]1ui[1]uo[1]uio[1]2ui[2]uo[2]uio[2]3ui[3]uo[3]uio[3]4ui[4]uo[4]uio[4]5ui[5]uo[5]uio[5]6ui[6]uo[6]uio[6]7ui[7]uo[7]uio[7]I will be targeting the widely available Microchip LAN8720A/LAN8720AI (which will be the only mention of AI in this article) PHY chip for this interface. I will be going more in-depth as to how this ASIC will be interfacing with this PHY later.Area#My second major constraint is my limited die area.I am paying for all this out of pocket afterall, and more area means a higher manufacturing cost. Now I am not trying to accumulate a pool of gold or anything, it’s just that, in compliance with Maslow’s hierarchy of needs, waffles rank higher than area, and higher manufacturing cost means less waffles. So just like any semi-conductor company, I am incentivised to keep my area budget under control.Maslow’s hierarchy of needs, distorted ASIC edition.Because store-and-forward requires the switch to store the entire packet before forwarding it, and because ethernet frames can reach upwards of +1.5k Bytes (and +9k for jumbo frames), they require massive amounts of storage. A workaround for that would be to store the packet to some off-chip memory but I don’t have the pin budget to afford that right now, so on-chip memory is my only option.The problem is, on-chip memory consumes a lot of area given the large area footprint of SRAM and the even larger area per stored bit footprint of flip-flops.Now if we were talking of a few bytes this could be negotiable, but for multiple 1.5k Bytes packets this is a dealbreaker, thus ruling store-and-forward out.Very very high resolution render of the switch ASIC floorplan using Tim Edward’s excellent OCD 256x8 SRAM IP, for scale. Using W orientation.Assuming I was using Tim Edward’s excellent OCD 256x8 SRAM IP, a single 256 Byte SRAM occupies 301.3 x 224.93 um (using W orientation in this implementation) and consumes just by itself 1/3 of the floorplan. If we want to store even a single full packet we would need 6 of such instances, and since we have 3 ports, we would then need to replicate that 3 times, so 18 instances in total. Now, we have a larger 1028 Byte version of this SRAM that is 301.3 x 515.81 um which nicely increases our storage area density. But again, if we were to instantiate six such macros this would occupy x3 the area than we currently have to spare.Now, the Tiny Tapeout shuttle chip does support me scaling up this design up at most another two factors of two, or 4x. But the cost would also scale by a factor of 4, at which point we are getting into full chip orders of magnitude of cost. And if I were to go down the full chip route, since I then have the possibility of having a lot more pins to play with, this re-unlocks the possibility of interfacing with much larger external memories, thus changing the landscape of what the correct technical tradeoff would be again.RTimothyEdwards/gf180mcu_ocd_ip_sram3.3V SRAM macros for GF180MCU, based on the original 5V SRAM macros.Verilog225Easy to use#Lastly, I want something that doesn’t require external software or configuration.Firstly because I would like external third party users in the community to be able to easily pick this ASIC up and start using it. And that becomes increasingly difficult as soon as I start involving custom software. I am aiming for something that is as close to plug and play as possible with ease of use being a measure of success.Not to say that the community won’t be able to compile and flash my custom embedded abominations, just that their willingness to do so decreases exponentially with each extra step.Secondly because I am once again working on a very tight schedule and that custom software support adds significant amounts of time to both the pre-tapeout and bringup workloads. (Let’s not forget we are still talking about a single person’s project here.) This would be especially true for this ethernet switch project since I would aim to be compatible with a widely adopted open source switch management software and protocol like SNMP for monitoring or SSH for monitoring and configuration.Support for these protocols is not at the level of something I can trivially implement in hardware, especially for SSH, and the best design decision would be to offload to a CPU. So either integrate an on chip CPU on the ASIC or, build a custom interface to an external MCU and offload all these requests to it. Both options involve a significant software effort, with the on chip CPU also promising a huge design effort and even more area usage. At which point, I am approaching the planned architecture of the router rather than the first generation of the switch.So, for both of these reasons, an unmanaged switch is the path I am taking.What are we building?#So to recap, I am building a:3-portFull-duplex100 Mbps bandwidthcut-throughunmanagedethernet switch.Now that we have figured out what we’re building, it’s time to focus on the fun part: how to build it! 🥳System Overview#The real Ethernet frame that is hidden from view#Most people have actually never seen a full ethernet packet.When you inspect Ethernet traffic on your computer via tcpdump or wireshark, you actually only see part of the Ethernet frame, with some parts missing. These parts are generally stripped out by your computer’s network interface before the packet is forwarded to the software realm, thus hiding them from user’s view.Random IPv4 packet captured over tcpdump (tcpdump -xx -e -v 'ether proto 0x0800') :16:36:51.298082 60:e9:aa:92:dc:7d (oui Unknown) > 5c:e9:31:1e:9d:00 (oui Unknown), ethertype IPv4 (0x0800), length 78: (tos 0x2,ECT(0), ttl 64, id 0, offset 0, flags [DF], proto UDP (17), length 64) superpitchu.53332 > dfw25s53-in-f9.1e100.net.https: UDP, length 36 0x0000: 5ce9 311e 9d00 60e9 aa92 dc7d 0800 4502 0x0010: 0040 0000 4000 4011 2b98 c0a8 0085 4a7d 0x0020: 0369 d054 01bb 002c a93f 6fe8 5bd5 5378 0x0030: f4c9 ccae 477c 5083 0696 8fa4 4f62 57bf 0x0040: 41a9 78a3 fc60 7781 2b8b 38a1 2ccdThe missing parts are:Preamble + SFD: Before the start of the MAC header exists a sequence of 7 bytes of an alternating bit sequence signifying that a packet is about to start, called the preamble, followed by a 1-byte marker ending in a double asserted bit sequence called the SFD (Start Frame Delimiter) signaling that the next bits are the MAC header.Frame Check Sequence Footer: At the end of the packet there is a 4-byte footer called the FCS (Frame Check Sequence), used to check whether the Ethernet frame’s content was corrupted during transmission. This is checked by both store-and-forward switches and by most computers’ network interface cards and these drop all frames that fail this test before the packet is forwarded.Raw packet overviewAnd since, once they have been evaluated by the networking interface, both the Preamble+SFD and FCS serve no further relevant purpose, they are stripped out before the remaining packet bits are forwarded up the networking stack.Now, since we’re going through the Microchip PHY, we won’t actually be interfacing directly with the Ethernet physical layer, as it will be abstracting away the precise 100BASE-TX PHY behavior, though the full ethernet frame will remain intact (including Preamble+SFD+FCS)All our data transmission and reception will actually be done through the RMII bus interface.The RMII interface#LAN8720A to application device interface diagram taken directly from the LAN8720A/LAN8720AI datasheet. For our application the MAC and RMII block are going to be part of our ASIC and we will have 3 such interfaces in parallel. Like in this example, both the ASIC and all the 3 LAN8720A chips will be driven by the same external 50MHz reference clock signal.RX#rxv valid signal (crs_dv in the diagram above )rxer error signalrxd[1:0] two data signalsOn the RX (reception) side of RMII, we have four pins: two for data, one for data validity, and one to signal that an error has occurred on the line. Interestingly, this valid signal isn’t a pure data-valid signal but an early data-valid signal, and it’s up to our ASIC to read the incoming data and correctly identify when the Ethernet frame data actually starts using the preamble and SFD. The valid signal actually asserts asynchronously a few cycles before the start of the preamble but, deasserts synchronously with the end of the Ethernet frame.TX#txv valid signal (txen in the diagram above )txd[1:0] two data signalsOn the TX (transmit) side, we only have three signals: two for data and one for valid, with no error signal. This makes sense, since the error signal is there to indicate issues on the medium, and since there is no medium between the ASIC and the PHY there is no need for it in the TX direction.Timing#Lastly the PHY chip’s datasheet outlines the expected timings for the interface signals.Unlike what my high level overview might have suggested, new data isn’t immediately available at the start of the clock cycle. Like in all real hardware there is an internal propagation delay. The same goes for how fast the data is allowed to transition after the start of a cycle. Because the PHY chip also contains flip-flops and is thus also subject to hold constraints, the previous cycle’s data must remain stable for a certain period of time after the clock edge before the new value can be propagated.RMII interface timing for the LAN8720A/LAN8720AI Microchip chip family. Documentation code: DS00002165C. I swear, this doc is so well written, it truly makes this chip such a pleasure to work with ❤️.So, implementing correct signaling alone isn’t enough to properly interface with this chip. If I want my ASIC to work I also really need to make sure my physical implementation’s resulting timing respects these constraints. This is both verified and enforced by specifying design constraint rules as part of the SDC (Synopsys Design Constraints) file.Now by designing around the constraints of the LAN8720A chip readers might be concerned that I am locking myself into a dependency on a single external chip.And actually that is kind of the case here, I am not proud of this but I caught this discrepancy too late, and not mentioning it in this article simply doesn’t align with the technically honest recollections I am looking to do here.Since RMII is regented by the RMII consortium, and since in the RMII specification they include the AC characteristics I blindly assumed the LAN8720A would be compliant.Turns out the LAN8720A isn’t actually compliant.And, although in many cases the LAN8720’s timings are actually more constraining than the official spec, when it comes to the hold constraints on the RX pins it is actually much looser at 1.4ns less than the RMII’s consortium’s 2.0ns.Although this might still work in practice, it would be by pure luck and I only believe in engineered luck!RMII Specification, AC CharacteristicsSo note to self for future versions: I should set this to 2.0ns to guarantee that the ASIC would work with other RMII chips.Apart from that, the LAN8720A is widely available, easy to get dev boards for, well documented, and at 103 cents a piece, worth every penny.The official Microchip LAN8720A developpement daughterboard not only came with a real paper datasheet but it was the most precious tiny datasheet I have ever seen.ASIC pinout#Putting it together, here is what the final pinout of our ASIC will look like connected to all 3 PHY chips. We will be referring to these as PHY0, PHY1 and PHY2.Indexui (Input)uo (Output)uio (Bidirectional)0phy0_rx_data[0]phy0_tx_data[0]phy2_rx_data[0]1phy0_rx_data[1]phy0_tx_data[1]phy2_rx_data[1]2phy0_rx_vphy0_tx_vphy2_rx_v3phy0_rx_err-phy2_rx_err4phy1_rx_data[0]-tx_phase5phy1_rx_data[1]phy1_tx_data[0]phy2_tx_data[0]6phy1_rx_vphy1_tx_data[1]phy2_tx_data[1]7phy1_rx_errphy1_tx_vphy2_tx_vAddress Resolution#At its heart, a switch is actually a conceptually simple piece of networking equipment whose role is to read and forward incoming Ethernet frames to the correct ports. Matching incoming packets destination MAC addresses to the correct port is accomplished by an internal structure called an address table.Like a software dictionary construct, it maps a destination MAC address to a switch port index.In order to build this correspondence, the switch reads incoming traffic’s source MACs, keeping track of which port each source MAC was seen on, in order to forward future traffic to the correct port.Putting it together: when an incoming Ethernet frame arrives, the switch first reads the destination MAC from the frame header and checks the address table for a matching entry. If there’s a hit, it forwards the packet to the specified port. And in cases where there is no hit, in a best effort to minimize packet drops, it broadcasts the frame on all ports except the one it came from.At least that is the high level overview, in practice, this is hardware, so things get a bit more hard (pun intended … no, I am not sorry).Filling the table#Recall that this switch is unmanaged, it needs to autonomously learn the correct ports corresponding to each device’s MAC address. It does this by reading the source MAC of all incoming Ethernet frames. Once it has the source MAC, it checks the address table to see if this MAC is already present. If no entry exists, it writes a new one.The requirement that all entries in the table be unique is not only a correctness requirement but also stems from two physical implementation constraints (see ASIC implementation rules for readers not already deeply familiar with ASIC design ):Most efficient utilization of the table: since the table is implemented in hardware not only is its size fixed but each additional entry is non-linearly more expensive. Since this first generation 3 port design only features 4 such entries it is imperative to make the most use of each entry, and duplicated entries are a pure waste.Timing: lookup of this address table is on the critical path. But by guaranteeing that each hit is unique, we can replace the priority mux selecting from individual entry hit to the table hit, with a lower logic depth and/or reduction tree. See the code below as an example for the entry port hit to table port hit.always @(*) begin /* verilator lint_off CASEOVERLAP */ (* parallel_case *) // telling synthesizer it can optimize this from a priority mux to a parallel case casez(mac_hit)
 R
↗
R
↗
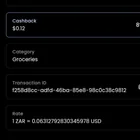
I put $10 into 8 different Crypto Cards to see which one works best in South Africa. My goal was to cut through the smoke and mirrors. Reward claims are locked behind tiers and hidden fees. Let's see exactly which card is honest, cheapest, and best for the end user. The Methodology: Time spent: 2.5 hours downloading, signing up, and doing KYC for 8 different cards. The purchase: 8 packets of Lays at a local OK supermarket (one on each card). Poor cashier. The cost per packet: R23.99. The official FX rate at the time: 1 ZAR = 0.061796 USD | 1 USD = 16.182216 ZAR At that exact spot rate, a R23.99 packet of chips should cost exactly 1.482492 USD. Any amount charged above $1.48 on my $10 balance is the hidden spread, network fee, or conversion tax. I expect most cards to round up to $1.49 when claiming a 0% fee, even though this will be a 0.50% fee incurred. Note: VISA and Mastercard are always at a slight premium above the official FX rate. Mastercard actually tends to have a slightly better raw exchange rate than Visa. *This is charged to the crypto platform issuing the card, which then passes the cost down to you. Visa sources its daily exchange rates directly from wholesale foreign exchange markets. Independent tests historically show that Visa’s actual base rate is usually only 0.2% to 0.5% higher than the true "mid-market" rate (the rate you see on Google). This tiny spread is mostly due to market fluctuations and the 1-2 day lag between when you tap your card and when the transaction officially settles. Here is the full breakdown of what it takes to get these cards in SA, and what they actually cost to use. The South African Crypto Card At Base Tiers Rank Card Net Effective Cost (on ~$1.48 purchase) Gross FX Spread Base Cashback Custody Virtual Card Cost Setup Time Key Strengths Key Weaknesses Best For 2 Coca 1.47 (after CB) 1.18% 1% (USDC, monthly) Non-Custodial ✅ Free ~8 min Good perks, stablecoin CB up to $10,000/monthBest Card with just 1 upgrade "Up to" higher tiers Balanced rewards + subscriptions 1 EtherFi ~$1.45 (beats market after cashback) ~0.51% 3% instant Non-Custodial ✅ Free (1st) ~8 min Highest base reward, tier upgrades suck $2k/mo cap for top CB Everyday spending + max savings 3 Bitget ~$1.47 (beats market) ~0.51% Fx fee refund Non-Custodial ✅ Free ~10 min Transparent Mastercard rate, Africa focus Limited ATM Self-custody + low friction 4 Wirex Competitive (~1.18% all-in) 1.18% 0.5% (WXT) Custodial ⚠️ Free ~12 min Long track record, multi-currency Volatile token rewards, strict POA Reliable backup 5 RedotPay Full spread (~2.53%) ~2.53% 0% Custodial ⚠️ $10 ~12 min High limits, popular in ZA No rewards, issuance fee High-limit backup 6 Bybit ~$1.53 (after points) ~2.53% 2% (points) Custodial ⚠️ Free Gated High limits, potential airdrops Double fees, points system Higher volume users 7 Kast ~$1.60 (expensive) ~7.93% 1.5% (locked) Custodial ⚠️ $2 ~10 min Solana-native, credit mode Flat fees kill small purchases Large USD/Solana spends only 8 Oobit ~$1.74 (very expensive) ~17.5% 1–10% (tiered) Self-Custodial ✅ Free ~7 min Direct wallet link (no preload) $0.25 min fee destroys small tx Large transactions only 1. 🥇 Coca Card Charged: $1.50 Base Cashback: 1% Paid back on the 10th. Remaining: $8.50 Wallet Architecture: Fully Non-Custodial ✅ Card Costs & Limits Virtual Card: Free Physical Card: $1 + International Shipping Monthly Spend Limit: $30,000 ATM Withdrawals: Fee-free up to $250/month (standard international network fees apply immediately to any amount over this threshold). Sign-Up & KYC Process Total Setup Time: ~8 minutes Email Verification ID/Passport Scan National ID Number (Entered Separately) Verification Questionnaire The Claim vs. The Reality Claim: Earn "up to" 8% cashback on purchases and 50% cashback on subscriptions like Netflix and Spotify. Note: The phrase "up to" does a lot of heavy lifting. Actual: 1% cashback on all purchases up to $10,000 Cashback paid in USDC on the 10th of each month 5% APY on Stablecoin No 50% subscription discounts FX Cost & Conversion Fee The Promise: "Zero FX Fees on Direct Pairs" (meaning a fee is applied here) https://preview.redd.it/rwiw16axodeh1.jpg?width=945&format=pjpg&auto=webp&s=56460937cfaf389808490e5200de493dad7dfc7a The Baseline Market Cost: $1.48 (Based on the true mid-market rate) The Actual Deducted Charge: $1.50 The Hidden Spread: A 1.18% markup applied on top of the mid-market exchange rate. Cashback: With the included 1% Cashback, this brings Coca to a 0% fee for the first $10,000 spent monthly 2. 🥈EtherFi https://preview.redd.it/cl7t5qezodeh1.png?width=617&format=png&auto=webp&s=4fd4286520d90e6707d36e4038de66d516626f79 Charged: $1.50 Base Cashback: 3% Instant Remaining: $8.55 with instant cashback. Wallet Architecture: Fully Non-Custodial ✅ Card Costs & Limits Virtual Card: 1st Virtual Free (Additional virtual cards are $10). Physical Card: $50 ⚠️ (Metal cards are unlocked on higher VIP tiers). Spend Limit: Up to $30,000/day on the free Core tier. ATM Withdrawals: $250/day limit with a 2% flat fee per withdrawal (there is no free tier for cash withdrawals). Sign-Up & KYC Process Total Setup Time: ~8 minutes Email Verification ID/Passport Scan Verification Questionnaire Mobile Number Verification The Claim vs. The Reality Claims: 3% Cashback Borrow without selling Up to 5% APY Earn on Autopilot Actual 3% Cashback on first $2,000 monthly spend You can spend against collateral while it continues to earn yield in a Vault. Liquid vaults offer high APY. The highest yield offer currently is Euro Yield 11.39% Real FX Cost & Conversion Spread The Promise: 0% FX fees on EUR and USD, with a 0% to 0.5% markup (plus network rate) for other currencies. https://preview.redd.it/xuc2xaaxodeh1.jpg?width=945&format=pjpg&auto=webp&s=99e42c4e83fd7b49631a2925f0ae5e89e9a62413 The Reality: While they do apply a small FX spread to convert your ZAR purchase, the cashback completely absorbs it. The Baseline Market Cost: $1.48 (Based on the true mid-market rate) The Actual Deducted Charge: $1.49 The Hidden Spread (Gross): A 0.51% markup applied on top of the mid-market exchange rate during the swipe. The Verdict: While EtherFi does apply a 0.51% network/FX spread when you swipe in Rands, their massive upfront cashback completely neutralizes the fee. Because your net cost was only $1.45, you mathematically paid less than the global market value for those chips. As long as you stay under the $2,000 monthly cap to retain that high cashback tier, you are literally beating the system on every swipe. 3. 🥉Bitget Wallet Charged: $1.49 Base Cashback: Full Fx Fee Refunded later. Remaining: $8.51 Wallet Architecture: Fully Non-Custodial ✅ Card Costs & Limits Virtual Card: Free Physical Card: $49 (Processing & Shipping fee) Spend Limit: Up to $5,000 daily limit. $100,000 yearly limit. ATM Withdrawals: No ATM withdrawals or over-the-counter cash withdrawals. Sign-Up & KYC Process Total Setup Time: 10 minutes Email Verification ID/Passport Scan National ID Number (Entered Separately) Verification Questionnaire Mobile Number Verification The Claim vs. The Reality Bitget is pushing hard into the African market (rolling out in SA in May 2026) and their marketing is aggressive, but they actually deliver on the backend utility. Claims: 0 fees Bank Transfers $5 bonus on sign up Earn as you spend Actual: Fx Fee is returned as pending cashback on transaction fees. This can only be claimed once the accumulated cashback balance exceeds $1.00. $5 Bonus unlocks after a single $5 transaction is made Bank Transfer using Banxa incurs as 6% fee The Real FX Cost & Conversion Spread The Promise: Non-USD payment fees - 1.7% https://preview.redd.it/hnay18axodeh1.jpg?width=945&format=pjpg&auto=webp&s=1dcc2713296fb25e79705edfac14396027be33ca The Reality: Out of all the cards tested, Bitget's Mastercard rails proved to be the most transparent and closest to the true mid-market rate. The Baseline Market Cost: $1.47 (Based on Mastercards true mid-market rate) The Actual Deducted Charge: $1.49 The Hidden Spread: An incredibly low 0.51% markup applied on top of the mid-market exchange rate during the swipe. Below the 1.7% fee Bitget promises. The Verdict: When you factor in the $0.02 guaranteed cashback, your net effective cost drops to exactly $1.47 Bitget Wallet essentially subsidizes the entire Mastercard network fee, giving you a mathematically perfect mid-market exchange rate. 4. Wirex One Charged: $1.49 Base Cashback: 0.5% Remaining: $8.5 Wallet Architecture: Custodial ⚠️ Card Costs & Limits Virtual Card: Free Physical Card: ⚠️ Locked under Premium tiers Spend Limit: High daily limits, but heavily dependent on your tier and source of wealth checks. ATM Withdrawals: Free up to roughly $250/month (200 GBP/EUR equivalent); a 2% fee applies thereafter. Sign-Up & KYC Process Total Setup Time: ~12 minutes ⚠️ Email Verification ID/Passport Scan National ID Number (Entered Separately) Proof of Address - Strict verification required) Verification Questionnaire: The Claim vs. The Reality Claims: One of the original pioneers of the crypto card. Up to 8% Cryptoback on purchases Zero-fee FX globally Actual: Around since 2014, but the rewards system has become highly tokenized over the years. Token-Locked. To hit that 8%, you have to lock up a massive amount of their native WXT token. Standard base-tier users usually earn a modest 0.5% cashback, and it is paid entirely in WXT (which is subject to market volatility) rather than stable USDC. Mostly True. Wirex uses real-time OTC. However my ledger shows a tiny "ghost fee" Real FX Cost & Conversion Spread The Promise: 0% Fx Fee Globally. https://preview.redd.it/ha3f6iaxodeh1.jpg?width=945&format=pjpg&auto=webp&s=c8c3d3d463afd213a5456ed468547f04c248dba8 The Math Breakdown: Initial Balance: $10.00 The Swipe Charge (What the terminal requested): $1.49 Your Final Balance: $8.50 Total Actual Deduction: $1.50 The All-In Hidden Spread: A 1.18% markup on top of the mid-market exchange rate. The Verdict Wirex is highly competitive. A final all-in spread of 1.18% puts them right next to Coca and Bitget as one of the cheapest cards to use for spending Rands in South Africa. The only major downside is that their cashback is paid in their volatile native token (WXT) instead of stablecoins, and their strict Proof of Address requirements can make onboarding a headache. 5. RedotPay (Most Used in ZA) https://preview.redd.it/u61o1kbyodeh1.png?width=395&format=png&auto=webp&s=6b5dcf163e3654891ba8bd7da1bbcec100f9fe43 Charged: $1.515 (rounded up to $1.52) Base Cashback: 0% Remaining: - $8.48. *Card was $10 alone, so I needed to add $20 for this test. Wallet Architecture: Custodial ⚠️ Card Costs & Limits Virtual Card: $10 Physical Card: $100 + International Shipping Spend Limit: $1 Million yearly ($100,000 per-transaction limit) ATM Withdrawals: 2% fee up to $10,000 monthly (increases to 3% for amounts above $10,000). There is no fee-free ATM tier. Sign-Up & KYC Process Total Setup Time: ~12 minutes ⚠️ (Slightly longer due to address verification) Email Verification: ✅ ID/Passport Scan: ✅ National ID Number (Entered Separately): ✅ Proof of Address (POA): ✅ (Required for full limits) Verification Questionnaire: ✅ Mobile Number Verification: ✅ The Claim vs. The Reality Claim: "Up to 40% referral commission" and competitive conversion rates. Note: Their perks lean entirely toward affiliates rather than rewarding everyday consumers for spending. Actual: 0% cashback on regular card spending Yield earning available on stablecoins (USDT/USDC) Crypto credit lines available against collateral. P2P Integrated (with almost no usage though) USD and EU Banking Accounts A great Referral program FX Cost & Conversion Fee The Promise: "High Limits, Low Fees" (Typically citing a ~1% internal crypto-to-fiat conversion fee). https://preview.redd.it/susrflaxodeh1.jpg?width=945&format=pjpg&auto=webp&s=fa20f1acdd294fe7a6c51b3c5cfaaae36abdbd60 The Baseline Market Cost: $1.48 (Based on the true mid-market rate) The Actual Deducted Charge: Claimed - $1.515 Actual in bank - $1.2 The Hidden Spread: A 2.53%% markup applied on top of the mid-market exchange rate. Cashback: With 0% base cashback, RedotPay offers no consumer rewards to offset this spread, making that ~2.53% markup your true, out-of-pocket expense 6. Bybit Card https://preview.redd.it/fb263vezodeh1.png?width=604&format=png&auto=webp&s=a3fab4230ef0c8ab1e87e9cae7c33d8c33988023 Charged: $1.50 Base Cashback: *2% given in points. Remaining: $8.47 Wallet Architecture: Custodial ⚠️ Card Costs & Limits Virtual Card: Free Physical Card: $29.99 ⚠️ Spend Limit: Up to $10,000 daily / $50,000 monthly ATM Withdrawals: First $100 per month is free; a 2% flat fee applies to all withdrawals after that. Sign-Up & KYC Process Total Setup Time: Usually fast, but heavily gated for South Africans. Email Verification ID/Passport Scan National ID Number (Entered Separately) Proof of Address (POA) Tax Number Authenticator Set Up The Claim vs. The Reality Claims: Up to 10% Cashback Cashback on every purchase $10 Airdrop after depositing $100 100% off some subscriptions Actual: 2% on starter tier Paid in points. The cashback isn't paid directly in USDC. $10 Airdrop includes a 100 USDT Deposit and spending on the card. Must manually claim Must spend 500 USDT a month to unlock 100% subscription cashback. Works for multiple subscriptions The Real FX Cost & Conversion Spread The Promise: A transparent ~2% Foreign Exchange Fee. https://preview.redd.it/7lllufaxodeh1.jpg?width=945&format=pjpg&auto=webp&s=075b9b875e5774bd0e15decfd6031b69c57389a0 The Reality: Bybit actually hits you with a "Double Fee" if you hold stablecoins. They charge a 2% FX fee for spending outside of USD/EUR, but they also charge a 0.9% Crypto Conversion Fee to convert your USDC into fiat to fund the transaction. They claim a “Currency & Fee Breakdown” where they show exactly how I paid $1.5. However, my balance showed something else. On further investigation, I can see the actual USDC charge was $1.5237. When you spend using their card, you aren't just dealing with standard Visa or Mastercard fees… You are also dealing with Bybit's internal exchange fees for converting your crypto into fiat before the swipe even happens. https://preview.redd.it/0d1xfjaxodeh1.png?width=1080&format=png&auto=webp&s=2eb4d6b59c9b52647190e9cd9aa1da01759f1ff7 Let's break down your exact math: Initial Balance: $10.00 Actual USDC Deducted: -1.5237 USDC Final Balance: $8.47 The Baseline Market Cost: $1.48 The Actual Deducted Charge: $1.52 (1.5237) The Hidden Spread (Gross): A 2.53 % markup applied on top of the mid-market exchange rate. (This perfectly matches their 2% FX fee + roughly 0.9% crypto conversion fee) The Verdict Bybit's fee structure is heavy. Hitting you with a 2% regional FX fee plus a 0.9% crypto conversion fee pushes your gross markup to almost 3%. While the 2% cashback brings your net out-of-pocket cost back down to $1.49 (a highly competitive net rate of ~0.76% above market), those rewards are paid in points, making it a bit more tedious than cards like EtherFi that pay out instantly in stablecoins. The 100% off subscriptions are a heavy incentive, though. 7. Kast https://preview.redd.it/9mmulwezodeh1.png?width=677&format=png&auto=webp&s=6a46ccfe7d04a35b5b13bfb17038090ae60a5d1d Charged: $1.60 Base Cashback: 1.5% Remaining: $6.40 *Incl $2 Virtual Card Wallet Architecture: Custodial ⚠️ Card Costs & Limits Virtual Card: $2 ⚠️ (Kast markets the base tier as "free" in 2026, but regional variations or legacy signups often trigger this $2 issuance fee). Physical Card: ~$40 + Delivery Spend Limit: Unlimited daily purchases. ATM Withdrawals: $3 flat fee + 2% of the withdrawal amount ⚠️ (Very expensive for pulling ZAR cash locally). Sign-Up & KYC Process Total Setup Time: ~10 minutes Email Verification ID/Passport/Drivers Scan National ID Number (Entered Separately) Proof of Address (POA) Verification Questionnaire Mobile Number Verification The Claim vs. The Reality Kast heavily markets itself as a premium, Solana-native lifestyle card. The perks are solid, but they come with strings attached. Claims: 0.5-1.75% Fx Fees 1.5% cashback. Solana-First Architecture Actual $0.10 to $0.20 "Low Transaction Surcharge" on any non-USD purchase under $25. On the standard tier, you get 1.5% cashback. However, the catch is that it has a 14-day holding period and cannot be withdrawn to external wallets. It is locked inside the Kast ecosystem to offset future card purchases. Top-ups flow through the Solana network (USDC, USDT, SOL), delivering near-instant settlement and sub-cent gas fees to fund your card. The Real FX Cost & Conversion Spread The Promise: up to 1.7% fx on purchases under $25. A flat $0.10 on any purchase under $25. https://preview.redd.it/6jlkeirxodeh1.png?width=945&format=png&auto=webp&s=a49c000625364a082c009dad5130fea0a2ba663e The Reality: Kast absolutely punishes small, everyday local purchases due to a hidden micro-transaction penalty buried in their terms of service. The Math on Your End: $10 deposit - $2 virtual card fee - $6.40 remaining balance = $1.60 deducted for the chips. The Baseline Market Cost: $1.47 (Based on the true mid-market rate) The Actual Deducted Charge: $1.60 The Hidden Spread: A massive ~7.93% markup. They claim there is either a 0.5-1.75% fee or a $0.10 fee. But in this case they’ve included both a 1.18% markup + $0.10 The Verdict: Kast works as a card if you are spending heavily in USD or moving large amounts of money on the Solana network. However, for daily, small-ticket ZAR spending like coffee or groceries, their flat low-transaction fees make them mathematically one of the most expensive cards you could possibly use in South Africa. 8. Oobit https://preview.redd.it/a3ci2u2zodeh1.png?width=549&format=png&auto=webp&s=d8d2896409c540be77efd425de508f2f2574ca71 Charged: $1.74 Base Cashback: 1% Remaining: $8.26 Wallet Architecture: Web3 Bridge (Self-Custodial) - Funds stay in your own Web3 wallet until the split-second the transaction is authorized Card Costs & Limits Virtual Card: Free Physical Card: ❌ Not available. The platform operates entirely via Apple Pay and Google Pay integration. Spend Limit: Up to $5,000 daily / $150,000 monthly. ATM Withdrawals: Not supported (virtual only). Sign-Up & KYC Process Total Setup Time: +-7 minutes Email Verification ID/Passport Scan National ID Number (Entered Separately) Verification Questionnaire Mobile Number Verification The Claim vs. The Reality Claims: Up to 10% Cashback Never Pre-Load Again Bitcoin Debit Card Actual: Heavy spending or Oobit Token Spending is required. The 10% rate is strictly limited to purchases made using their native OOB token. If you pay with stablecoins (USDT/USDC), cashback tops out at 5%. You only unlock that rate after you have already spent $1,500 through the app within a 90-day cycle. Oobit aggressively markets its cashback program, but the reality is heavily restricted by regional and asset limitations. This is their killer feature. You can send money to your account, but unlike crypto cards, Oobit connects directly to your wallet, staying in crypto until you pay, with no preloading. You can absolutely pay with Bitcoin Directly, but watch out for fees. The Real FX Cost & Conversion Spread The Promise: Oobit is transparent about pricing, 1% transaction fee OR a $0.25 minimum, whichever is higher. https://preview.redd.it/tecl2oaxodeh1.jpg?width=945&format=pjpg&auto=webp&s=d5b4d90ef0c955b6e78b9540126dc872ba98a2ff The Reality: I paid a 0.51% fee + the $0.25 The Baseline Market Cost: $1.48 The Oobit Flat Fee: 0.51% + $0.25 The Actual Deducted Charge: $1.74 The Hidden Spread: A staggering 17.5% markup applied on top of the mid-market exchange rate. The Verdict Oobit’s underlying technology is arguably the best on the market right now for true Web3 self-custody. However, their fee structure makes them completely unusable for small, everyday purchases in South Africa. If you use Oobit to buy an R5,000 plane ticket, you will only pay a standard 1% fee. But if you use Oobit to buy a R25 coffee or packet of chips, that $0.25 minimum flat fee will hit you with a 15% to 20% effective markup every single time. submitted by /u/tristynjoshua [link] [Kommentare]